Saturday, November 30, 2024

Building a Dim-Bulb Tester for Vintage Radios & TVs by Adam Wilson

I recently bought my first ever vacuum tube radio, a 1956 Philips 353A AM/FM set, which is by far the oldest item in my collection. I’ve been wanting to get into vintage radio restoration for some time now (after watching YouTube channels such as the excellent Mr Carlson’s Lab), as I find the electronics fascinating.

1956 Philips 353A vacuum tube bakelite radio.

Vintage valve radio sets are not something for beginners or the inexperienced, though, as they contain very high voltages (especially on the transformer-less AC/DC sets), so really require some specialist knowledge and equipment to work on safely. Also, their use of paper, wax, and electrolytic capacitors (which degrade over time) mean that they should ideally be serviced before being switched on for the first time.

There are several methods of protecting both yourself and the unit under test whilst working on a vacuum tube radio or TV set:

  • Use an isolation transformeran isolation transformer provides galvanic isolation between your supply and the mains, so physically limits the amount of power that can be drawn past it into the test load. This is ideal for preventing fires and nasty shocks.
  • Use a variac supply: a variac allows you to adjust the line voltage on your supply to the test load, which can be useful for initial soft-start tests or for reforming capacitors.
  • Use a dim-bulb tester: a dim-bulb tester uses an incandescent bulb in series with the test load in order to provide basic current limitation and regulation, which is useful for initial soft-start tests and for identifying shorts without damaging the set.

I already have an isolation transformer, and variacs are pretty expensive, so I figured I’d build myself a dim-bulb tester. You can literally cobble one of these together from spare electrical parts, but I wanted to make something a bit more professional.

This article is for informational purposes only – follow at your own risk!

A dim-bulb tester uses an incandescent bulb (rated based on the load, i.e. 60W, 100W, etc) in series with a mains load in order to provide basic current regulation and limitation, as the filament resistance increases in a non-linear fashion with temperature and, therefore, current. If there is a short somewhere in the set that is being supplied, the bulb will light up brightly but will prevent a dead-short across the supply, so will hopefully save the set (i.e. preventing damage to the tubes or mains and audio output transformers).

The design is really quite simple: the mains input goes through an on/off switch (optional), then through an incandescent bulb which is paralleled with a bypass switch (optional), then into a standard plug socket which the load is connected into.

Dim-bulb tester schematic (image credit: YouTube)

For my design, I decided to put all of these into a compact enclosure, with a fused IEC input and an Edison screw holder for swapping out bulbs – this required the following parts:

All the necessary parts.

I started off by planning out where I wanted everything to fit, to make sure that I had enough space without risking shorting anything out.

I then marked up the enclosure with the component positions using permanent marker.

It was then just a case of drilling and filing out holes for all of the components, taking care not to remove too much material by regularly test-fitting each one.

A hole saw and power drill makes short work of ABS enclosures.
When a hole saw is too big, a regular drill bit can be used to remove a lot of material.
Enclosure rework complete.
Mechanical installation complete.

Once the mechanical installation was complete, it was time to wire everything up. All of the components that I had selected use standard male spade terminals (except for the bulb holder, which uses screw terminals). I therefore cut up lengths of cable as required, then crimped the correct sleeved spade terminals onto them using my crimping tool – for the bulb holder, I stripped the cables and tinned the ends with solder to ensure a reliable connection, then fitted them to the screw terminals.

Electrical installation complete.

Once the electrical installation was complete, I went through and triple-checked all of my connections against the schematic using the continuity test mode on my multimeter, and everything checked out OK.

Finally, I tried it out using the Philips 353A tube radio that I am restoring (connected between my isolation transformer, a Killawatt-style power meter, and the radio), and it seems to work as intended – fantastic! Power is limited to the set when the bulb is in-circuit, and when the bypass switch is closed, full power is applied.

More on the tube radio restoration in a coming article.

Dim-bulb tester in action with the Philips 353A. 

Understanding Consumer Spending and the Economy by Dan Mitchell

Almost exactly 14 years ago, the Center for Freedom and Prosperity released a video explaining why consumer spending does not drive the economy.

Here’s John Papola (a.k.a., Dad Saves America) with similar analysis.

Understanding this issue is not merely a matter of recognizing causality (in other words, a strong economy leads to more consumer spending, not the other way around).

It also helps to understand why Keynesian economics is misguided. Simply stated, you don’t increase national income by having the government divert money from capital markets (investment) in order to artificially stimulate consumption (either directly or indirectly).

For those who want to get wonky, this is why the CF&P video explains the difference between gross domestic income (GDI) and gross domestic product (GDP).

Better policy is more likely if lawmakers focus on how national income is earned (GDI) rather than how it is allocated (GDP).

I’ll conclude by stating that it would be nice to debunk Keynesianism once and for all so that it doesn’t come back to life (like a monster in a horror film) whenever politicians are looking for an excuse to spend more money.

P.S. Since we’re now in the holiday shopping season, click here for John Papola’s economically themed Christmas carols.

P.P.S. If you want to enjoy some cartoons about Keynesian economics, click here, here, here, and here. Here’s some clever mockery of Keynesianism. And, since I’m publicizing John’s excellent work, here’s the famous video showing the Keynes v. Hayek rap contest, followed by the equally enjoyable sequel, which features a boxing match between Keynes and Hayek. 

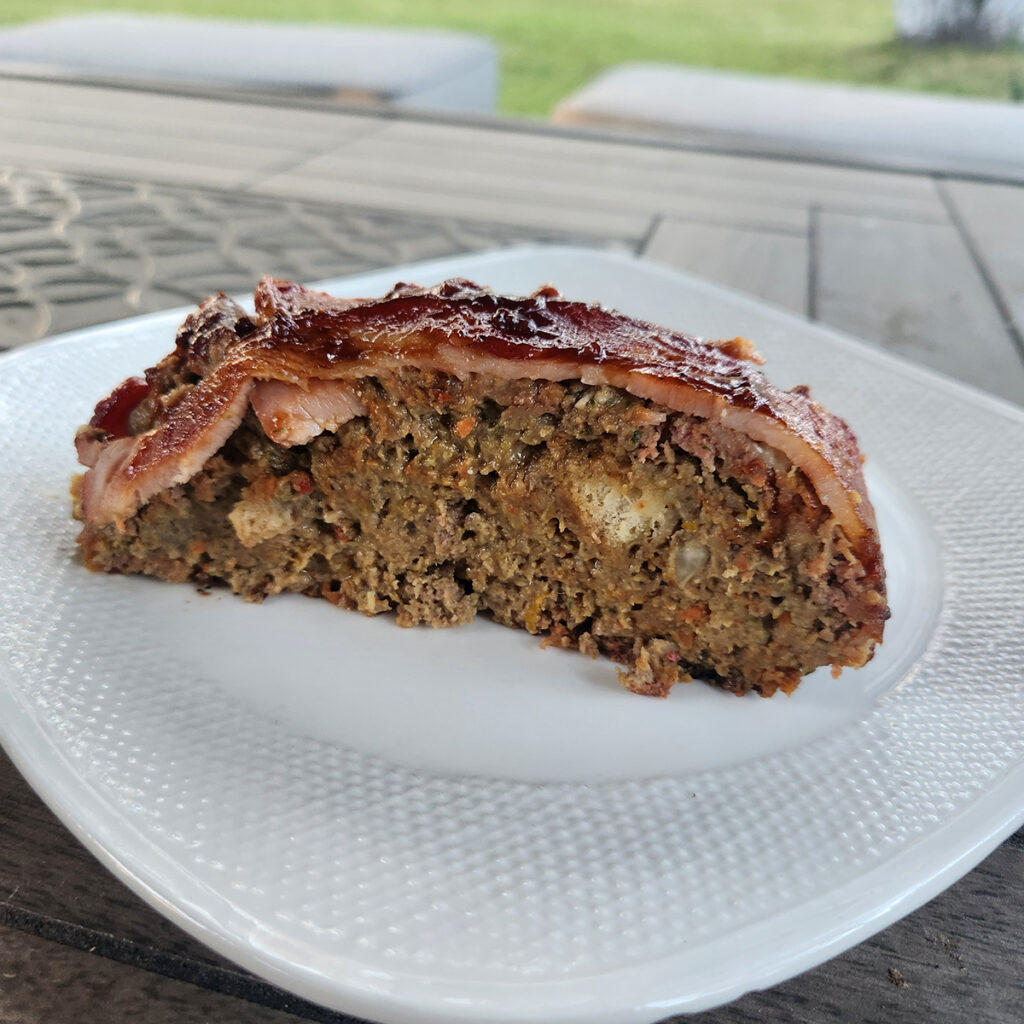
Stuffing Meatloaf By Alana Livingston

Thanksgiving leftovers! We all have them and you can only eat them for so long. Enjoy one of my favorite repurposed leftover stuffing recipes that comes together super quick and is perfectly hearty after a beautiful fall adventure. 

Photo Courtesy Alana Livingston

Ingredients: 2lbs. ground beef (or ground meat of your choice) // 1 ½ cups of leftover stuffing // 1-2 eggs 

Direction: Preheat oven to 350 degrees. Line baking sheet with parchment paper. Mix meat, stuffing and 1-2 eggs. (If your stuffing is on the drier side, you will need two eggs, but start with one.) There is generally no need to add seasoning due to the stuffing having already been seasoned. The more flavorful the stuffing, the more flavorful your meatloaf. Place mixture onto the parchment and shape into a loaf. Bake 45-60 minutes until meat thermometer reads 160F/80C.  

If you want to add a glaze or topping, add it to the top in the last few minutes of cook time. An easy glaze is equal parts ketchup and brown sugar. Or, try a favorite condiment or jelly. Spicy fruit preserves are delicious, or your favorite BBQ sauce (as featured in picture, wrapped in bacon, because why not?).  

This recipe works well with any leftover stuffing, but I strongly recommend the Artichoke Parmesan Sourdough recipe from Sunset Magazine for the best stuffing, therefore best leftover stuffing meatloaf, you’ll ever have. You’re welcome! 

Friday, November 29, 2024

Xiegu G106: From Unboxing to Your First POTA Activation (Beginner-Friendly Video!) by Thomas Witherspoon

Earlier this week, I mentioned that I purchased a Xiegu G106 in September. Its delivery was delayed because I had it shipped to my local post office, which, as you likely know, was flooded during Hurricane Helene.

With all the post-Helene chaos, I haven’t been able to do as much POTA as I’d like, so the G106 sat unopened in its box—until Wednesday, November 20, 2024, when I finally had a chance to take it out for its maiden activation at Lake James State Park (US-2739)!

Why the Xiegu G106?

Last year, Radioddity sent me a G106 on loan, and I wrote an in-depth review after taking it on several activations. That review was lengthy because radios like the G106—designed as price leaders—often have compromises that may not suit everyone. It’s essential to judge such radios based on their goals, not by comparing them to premium models like the Icom IC-705.

For the G106, the question I aimed to answer was: “Does this radio accomplish what it sets out to do?

I believe its mission is to offer affordable field radio fun—capable of completing park or summit activations without excessive struggle, providing performance commensurate with its price point.

I decided to purchase the G106 because I had returned my loaner unit over a year ago, but questions about it kept coming from readers. Instead of requesting another loaner, I opted to buy one.

To my surprise, the pricing had dropped significantly. Here’s my order confirmation:

Interestingly, as I mentioned earlier this week, Amazon (at time of posting) has a Black Friday deal for the G106 (without accessories) $199 shipped for Prime members [QRPer affiliate link].

I’d have chosen that over the bundle I ordered had it been available at the time.

Unboxing to Activation

It was a rainy day at Lake James.

A common question from readers has been, “Would the Xiegu G106 work as a dedicated field radio for POTA activations?

Perfect weather to set up in a picnic shelter!

Most of these inquiries came from newcomers to ham radio, so I decided to test the radio in the field by setting it up from scratch—straight out of the box. This included attaching connectors to the power cord, configuring the radio, setting up the antenna, and hopping on the air.

This is a lot of picnic shelter for such a small radio setup!

I started the activation using SSB (voice) and later switched to CW (Morse Code) to give a full “out-of-the-box” experience.

The resulting activation video (below) is lengthy but was incredibly fun to film!

Gear:

Note: All Amazon, CW Morse, ABR, Chelegance, eBay, and Radioddity links are affiliate links that support QRPer.com at no cost to you.

Radio

Antenna & Cable Assembly

Throw Line

Pack

Logging Supplies

Key and Cable

Battery and Power Distribution

Camera/Audio Gear

Misc

On The Air

This activation was nothing short of amazing.

I began in SSB mode, using only the default mic settings. Despite operating at just 5 watts, I logged 21 hunters in 17 minutes—woo-hoo! While most signal reports were low, no one mentioned issues with my audio. I suspect results will improve once I fine-tune the mic gain settings.

Switching to CW, I was met with a deep, relentless pileup. While operating, I noticed some sluggish AGC action on strong signals, which occasionally clipped the first call letter. Additionally, CW keyer timing felt slightly off at times. These quirks aren’t deal-breakers but could likely be addressed with a firmware update.

In total, I logged 21 CW contacts in 20 minutes, bringing my activation total to 42 contacts!

QSO Map

Here’s what this five-watt activation looked like when plotted out on a QSO Map. Green lines represent CW contacts, and red lines indicate SSB contacts. Click to enlarge:

Activation Video

Here’s my real-time, real-life video of the entire activation.  As with all of my videos, I don’t edit out any parts of the on-air activation time. In addition, I have monetization turned off on YouTube, although that doesn’t stop them from inserting ads before and after my videos.

Note that Patreon supporters can watch and even download this video 100% ad-free through Vimeo on my Patreon page:

Click here to view on YouTube.

Post-Activation Thoughts

I summarize my thoughts in the video, but here’s the gist:

At $200, the G106 offers impressive value.

While it does have quirks—such as sluggish AGC and occasional keyer timing issues—these are understandable at this price point. I’ll reach out to Xiegu to suggest addressing these issues in a firmware update. Whether they act on it remains uncertain, but it’s always worth asking.

Would it work as a dedicated, budget-friendly POTA or SOTA radio? Absolutely.

Before buying, I recommend reading my full review. But for $200, there’s not much to complain about. It offers more bands, modes, and out-of-the-box fun than anything else in its price range—though keep an eye on the QRP Labs QMX, which promises SSB support in the future.

If you own a G106, I’d love to hear your thoughts in the comments!

Thank you

Thank you for joining me during this unboxing-to-activation experience!

I hope you enjoyed it as much as I did!

Of course, I’d also like to send a special thanks to those of you who have been supporting the site and channel through Patreon, and the Coffee Fund. While not a requirement, as my content will always be free, I really appreciate the support.

As I mentioned before, the Patreon platform connected to Vimeo makes it possible for me to share videos that are not only 100% ad-free but also downloadable for offline viewing. The Vimeo account also serves as a third backup for my video files.

Thanks for spending part of your day with me! Have an amazing weekend!

Cheers & 72,
Thomas (K4SWL)