Wednesday, September 29, 2021

How To Winterize Your Tiffin Motorhome from TIFFIN MOTORHOMES

 The autumn leaves have begun to fall. Winter is coming. And that means it's time to start preparing your motorhome for hibernation. If you plan on parking it for a long period of time, winterizing is one of the most important parts of ensuring that your coach runs smoothly for many years to come.

“Customers need to winterize their motorhomes in frigid weather to keep water from freezing and damaging the expensive parts in their plumbing system," said D. Ray Hester, the Tiffin Service Center Shop Manager. “When pipes freeze and expand, then thaw out, tiny leaks or cracks can occur, which could ultimately cause water damage to the interior of the motorhome."

Below is the detailed checklist you need to be sure you don't forget an important step in winterizing your motorhome. We also have a video tutorial that will show you how to winterize your RV — check it out for a visual guide.

Before you start winterizing, be sure to have these items on hand:

  • 1-1/16-inch wrench or socket and ratchet
  • Water pressure regulator valve
  • RV antifreeze
  • Standard half-inch hose to connect to the inlet side of the water pump
  • Teflon tape

Prepare to Drain

First, dump your black and grey holding tanks before you dump your fresh water holding tank. Remember: It is important to dump black and grey tanks in a proper dump site or station!

Once completed, ensure both grey and black holding tank valves are closed, and disconnect the sewer hose completely.

Next, drain your fresh water holding tank and water lines. Water lines include hot and cold water lines, and your refrigerator water line. You’ll also want to drain your hot water heater.

  1. Now that you've emptied all the tanks and outside lines, it's time to test all faucets to check that both hot and cold water are no longer flowing.
  2. Drain toilets; then flush.
  3. Go to the shower and test that hot and cold water has drained.
  4. Run the washing machine and dishwasher to ensure they are also drained.
  5. And finally, return to the outside service panel containing your city water fill. This is usually the same outside panel containing the grey and black tanks. Have a regulator on hand that is pre-set between 40-50 pounds of air. Anything more could cause damage to faucets and lines. Hook your regulator up to the city water fill, and connect it to the water heater. Water will run freely.
  6. Then, wrap Teflon tape around the base of the anode rod and install it into the water heater. Start by turning it by hand before using your wrench to avoid cross-threading. Tighten the rod back up with a wrench and reinstall the protective plate.

Don't Forget to Drain the Refrigerator

Placeholder ImageFridge New

To drain the water dispenser of the refrigerator, one person will need to be inside at the fridge to press the water dispenser down, and one person will need to be outside to hook up the air hose to the water line. Once the hose is pushing air through, all remaining water will run free from the water dispenser, so be ready with a large cup.

Next, remove the water filter from the fridge. Install a plug (which came with your coach) where the filter was located, and close it up.Now you can reconnect the water line to the fridge, and turn the valve back to an open position.

Last Steps: Add Antifreeze

Placeholder Image5

To safely add antifreeze to each water source throughout the coach, follow these steps:

  1. First, bypass the water heater. Do this by turning the lever to “bypass" so that antifreeze will not run through the water heater. This is a very important step.

  2. Now attach your common air hose to the city water gauge, so that air pressure will run through all your appliances' water lines. Return inside to flush out all hot and cold water from faucets by letting them run dry.

  3. Go back outside and take the pressure you have connected to the city water gauge back off.

  4. Install the antifreeze via the inlet side of the water pump, usually identifiable by the clear plastic screen. Do so by disconnecting the inlet side and attaching a half-inch clear hose, then place it into the antifreeze. This hose comes with standard packages in a Tiffin motorhome, but you can also purchase it at your local hardware store or from the Tiffin parts department.

  5. Turn on the water pump, and turn the faucet back on. You will see the antifreeze run through the faucet by turning on both hot and cold water. The same applies to the dishwasher and washing machine. Don't forget about the outside faucet or shower.

  6. Leave faucets open, meaning leave them in a position as if they would be running. The antifreeze will eventually run dry.

  7. Pour antifreeze into all sink drains and clean off remnants from the sink bowl. Then pour it into toilets, allowing it to remain there for the season. Repeat the same with your showers.

  8. Then pour it into toilets, allowing it to remain there for the season.

  9. Repeat the same with your showers.

NOTE: It's important to remember that there are many types of motorhomes, and because of that, these steps may vary from brand to brand. This checklist was based on a Tiffin motorhome.

Moved house - new shack setup!

Jeff Crippen's Anacapa Offshore Pacific Power Dory

The Cold War | Footage Farm Ltd

Alpine Summits and SOTA - Thunderbolt and Picture Puzzle Peaks

Penntek TR-25 QRP CW transceiver, first field test and DX QSO

Top 10 FT8 Operating Tips from M0JCQ's Ham Blog Adventures in Ham Radio

 I’ve been slow off the mark with this blog post, but years ago I posted my Top 10 PSK31 Tips for Beginners guide and it was really popular at the time. I’ve held off writing this post, so that it could be a (hopefully) genuinely useful post, as opposed to just jumping on a hot trend!

Over the last few years PSK31 and its variants were replaced by a new data mode… FT8. This data mode has truly come to dominate both the HF and VHF bands, to the extent that it’s becoming rarer to find much SSB and CW activity, regardless of any other data modes on a given band!

The following tips are comprised of my experience of using FT8 for a few years, since it was first released back in 2017. I’ve had 3,000+ FT8 contacts across bands from 160m right through to 70cm.

1. Stick to a Single Frequency

This is probably where a lot of beginners go wrong. Try and find a clear frequency and then stick with it, regardless of whether you call CQ or respond to others. The Hold Tx Freq option is your friend in WSJT-X:

Hold TX Freq option in WSJT-X

Hold TX Freq option in WSJT-X

This will ensure that you always transmit in the same place and importantly you don’t keep hoping around the band.

Why does this matter? Well, you’re more likely to be decoded if you’re replying to another station off of his own frequency. If you move to their frequency then you could be competing with other stations.

Also we’ve all had it, where we’re happily running on a frequency, then a station works you and then proceeds to stay there and call CQ on ‘your’ frequency. It’s annoying and typically the other station isn’t even aware they’re doing it!

2. Time Synchronization is Key

If you’ve used data modes like RTTY and PSK31 in the past, then you’re probably used to random receive and transmit cycles where you click a signal and transmit as soon as the other station has finished. 

FT8 (and the other WSJT-X modes) demand perfect timing, so perfect it’s beyond most of us to get right! If you’re computer clock is off by 2 seconds or more, then most likely your signals won’t be decoded by others, and no one else will even see your calls!

Your native Windows clock is likely to drift very quickly, unless you keep it trained to an accurate clock via the internet. I personally use Dimension4 to do this. It’s free and every 30 minutes it automatically synchronises my PC clock with an accurate reference online.

3. Learn the WSJT-X Colour Coding

WSJT-X helpfully colour codes your decoded messages, so you can spot important messages quickly.

If a new DXCC starts calling CQ which you’ve not seen before then this will be highlighted in dark purple (by default), if it’s a new DXCC for you on the band, then it’ll be highlighted a lighter shade of purple. Useful!

It’s worth taking a look at the ‘Colors’ tab within the WSJT-X settings and learning these. This will allow you to quickly act on something you may ‘need’ like that rare DXCC or that rare grid square. 

WSJT-X Message Colours

WSJT-X Message Colours


4. See Where You’ve Been Decoded

The PSKReporter.info website is a very useful tool to find out first of all if you’re getting out, and secondly where in the world you are being heard!

This gives you an almost real time summary of the propagation on your chosen band, it’s a great way to just understand the possible HF paths which may be open at a certain time of day.

Being received well in JA on 20m

My messages were being received well in Japan on this day (using 20m)

I typically have this running and check it every 20 minutes to see what I might be able to work or how propagation is changing to favour a certain area of the world.

Observing this resource has allowed me to work a lot of DX:

Pileup of JA stations on 20m FT8

Pileup of JA stations calling me on 20m


5. Persevere

One misconception is that FT8 can be like shooting fish in a barrel, but it’s not always easy to “work the world”. The vagaries of propagation still come into play. Conditions can change quite quickly with openings appearing and fading out.

If a station doesn’t respond to your call straight away, try leaving it calling them for a few cycles.

The conditions might just swing in your favour, then they can decode your message.

This is another great reason to operate away from the other station’s frequency; you can continue calling them while they’re in a QSO, without you interrupting it and you might end up possibly being worked straight after.

I used to give up a bit too quickly, but found that perseverance (especially with DX stations) usually paid off.

6. Enable ‘Deep’ and ‘AP’ Decoding

Without going into too much technical detail here, your FT8 decoding will be more sensitive if you set your WSJT-X decoding settings to ‘Deep’ and ‘Enable AP’: 

Enable AP in WSJT-X

Enable AP in WSJT-X


Deep decoding throws more of your computer power at decoding the signal. While AP (a priori) uses heuristics and known information to decode messages, which otherwise wouldn’t be decoded.

Deep decoding comes with a performance penalty, your computer may not decode all received signals before the next time period starts. While using my old shack laptop, I found this to be a problem when decoding a busy 20m band, but after upgrading I use it all the time now. You can always drop back to ‘Normal’ decoding if you notice this.

Enabling AP on the other hand can introduce some unusual side effects with the decoded message. If the callsign looks funny, then it’s probably incorrect. It easy to see which messages had AP applied to them:

Decoded message using AP

Decoded message using AP

Use your brain here – if it looks funny to you, then it’s probably not right!

7. Can’t Decode a Strong Signal? Lower your RF Gain

Sometimes you’ll see a large signal on the Waterfall, but WSJT-X can only occasionally decode it, but at worst just cannot decode any of the messages at all. The station seems to be transmitting accurately timed signals, but nothing shows up, how strange!

I’ve noticed this occurring during strong openings, especially during Sporadic-E season on 6m, where strong signals of 10dB+ just won’t decode.

I’ve found that simply turning down your rigs RF Gain will allow the messages to be decoded. A simple fix, but if you’ve not used other data modes you might not think to do this!

8. Not Getting Many Replies to your CQ Call? Change Frequency

You may find that for whatever reason you are not getting any responses to your CQ calls. This could be down to a number of factors, but it’s always worth checking to see if your chosen frequency is clear within your chosen TX timeslot.

If another station is transmitting on your frequency or nearby during your TX timeslot, then other stations may not be able to decode your messages in order to even see your CQ messages.

Even if you still can’t see anything else when just receiving during your timeslot, there could well be another station on the same frequency which your DX is seeing, but you’re not.

I’ve found it worth while moving frequencies, if you’re not getting much luck, it usually works!

9. Change Timeslots

If you’ve spent a while using one timeslot (say even TX), then why not switch to the other one? This might net you a whole new haul of stations to work.

For me this usually leads to an (initial) increase in contacts and obviously allows you to work stations not worked in your other timeslot. I tend to keep switching between these timeslots every 20 minutes or so.

How to switch TX timeslots in WSJT-X

How to switch TX timeslots in WSJT-X


A word of warning here: make sure there are no timeslot conventions on your chosen band. VHF bands have a convention where your timeslot is chosen based on your location, in order to prevent nearby stations interfering with each other, when you’re all trying to receive distant and weak DX. Your RF neighbours won’t thank you for breaking this convention.

10. Pay Attention to all Received Messages to Spot DX

WSJT-X will decode all messages across the 3kHz spectrum of the band you’re using (or less depending on your radios selected filter). This can result in many decodes on a busy band like 20m.

I’ve spotted quite a lot of DX and then subsequently worked them, without ever seeing them call CQ! DX stations are often overwhelmed by stations calling them, so don’t often need to call CQ.

By monitoring all messages (not just highlighted CQ messages) in the left hand ‘Band Activity’ pane, then you might just spot some rare DX lurking. You might also notice a number of other stations calling a DX station during your RX timeslot. A simple switch to the other timeslot and you might just be able to decode and then work them.

This has netted me a number of DX stations I would have otherwise missed by just paying attention to CQ messages only!

Summary

These are my top 10 operating tips for FT8 using WSJT-X, these are all learned based on my experience and hopefully there’s something of use here.

What have I missed? What would you add here? Let me know in the comments!

Cheap Wire Antennas -vs- Height Above Ground

Tropospheric Ducting Ham Radio 2 Meter VHF Band

Solar Powered Crypto Mining: Making free money with sunshine!

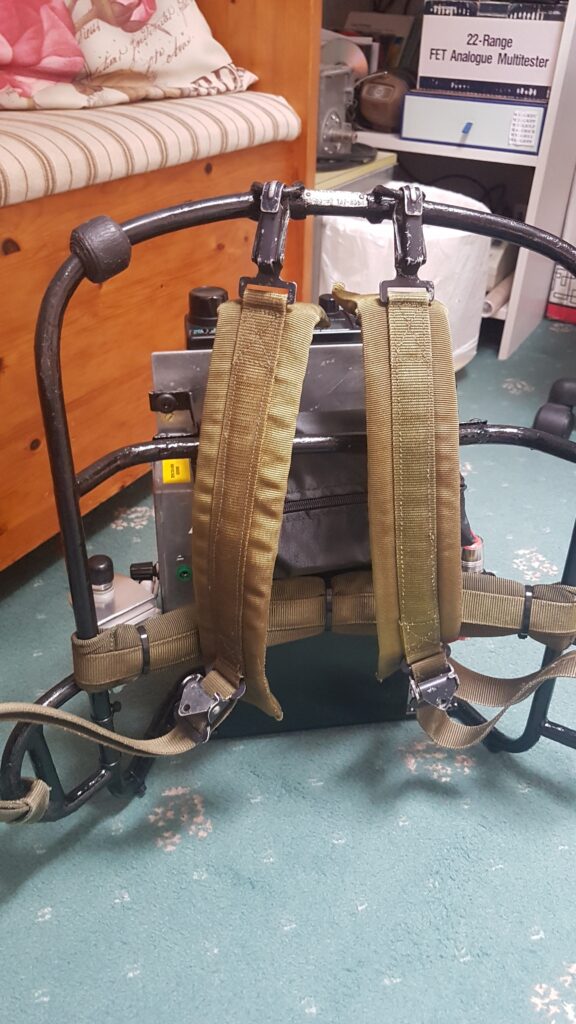
New “HF Backpack Pedestrian” Mobile by Dave G4AKC


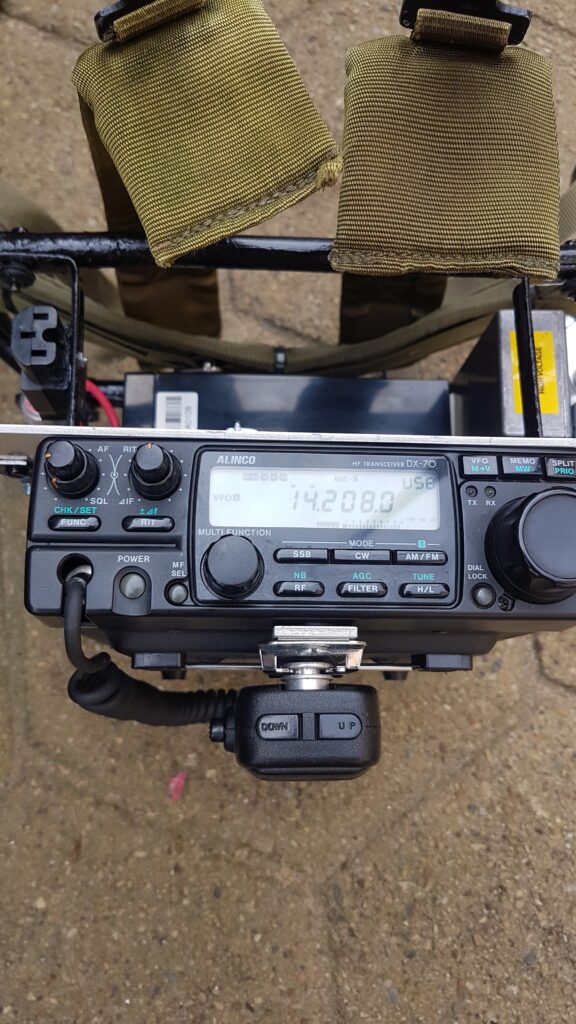
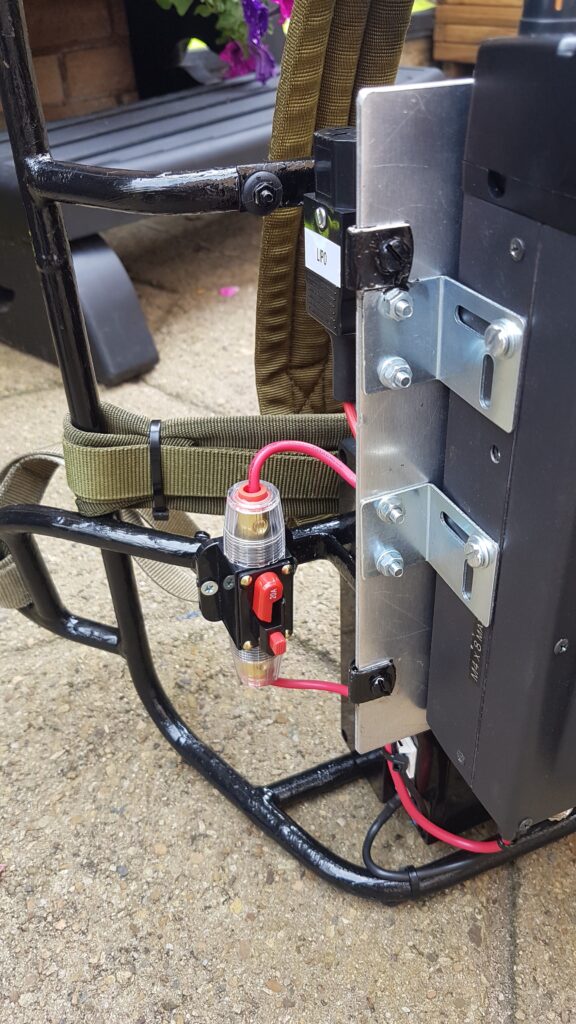
The new backpack consists of a “Clansman metal frame” carrying a modified Alinco DX-70TH transceiver, this is powered by a lightweight 22Ah LIPO battery which has its own dedicated charger.

The antenna is a modified MFJ-1979 17ft telescopic stainless steel antenna which is matched against a toroidal ground tuning unit (GTU).

The system does not require an ATU as the antenna is adjustable in length to provide a good match between 14MHz and 30MHz, the ground tuning provides the necessary ground coupling for the antenna to work against, there is more information about GTU principles on https://www.g4akc.co.uk/ground-tuning-units-gtus/

The set up provides up to 90 Watts RF into the antenna and the whole backpack including antenna is only 17 pounds in weight.

This set up is an update to my original backpack from a few years ago shown here: https://www.g4akc.co.uk/hf-backpack/

Update:

Went out onto the beach here in Blackpool a couple of days after completion of the backpack pedestrian mobile and the results were excellent with contacts into South Africa, USA, Canada and South America, signal reports were really good and it was easy to carry for the hours operations along the beach.

Dave G4AKC

The Ultimate Survival Jacket? A Work In Progress.

#30 The Unlimited Possibilities of Portable Radio

YELLOWSTONE AND GRAND TETON: SOTA AND POTA by BOB K0NR

 Visiting Yellowstone and Grand Teton National Parks is a favorite trip for us. It is a 9-hour drive to get there from Colorado, so we can make it in a day.  In September, we visited these two parks with a blend of activities in mind: RV camping, hiking, viewing wildlife and ham radio. The ham radio part means Summits On The Air (SOTA) and Parks On The Air (POTA).

The Teton mountains tower above the Snake River.

Our trip started from Monument, CO, followed by a stop at our cabin near Trout Creek Pass. Heading north, we spent one night at Steamboat Lake State Park (Colorado), which broke up the road trip into smaller sections.

A few of the many buffalo (bison) in Yellowstone National Park.

Grand Teton NP

Grand Teton NP listed 27 activations for POTA (POTA K-0031) which is really not that many activations for such a well-known national park. The park and the surrounding national forests have many SOTA summits available, some quite difficult to climb (such as 13,770 foot Grand Teton).   We camped two nights at Colter Bay RV Park, inside the park. This is a decent RV-style campground with full hookups and campsites packed in a bit tight.

Joyce/K0JJW campsite operating POTA from the Grand Teton campsite.

Our usual POTA station is the Yaesu FT-991 driving a single-band end-fed halfwave (usually 40m, 20m or 17m) supported by a fishing pole and powered by a 20 Ah Bioenno battery. Joyce/K0JJW likes to use a paper log but I usually log my contacts with HAMRS, either on my notebook PC or an iPad. HAMRS is a relatively new logging program that runs on most operating systems (Windows, Mac, Linux, iOS, Android, etc.) It is tuned for portable operating, with templates for SOTA and POTA. Check it out, if you haven’t tried it.

One unfortunate surprise while operating from the campsite was a ton of RFI coming from the electronic devices in use by the herd of RVs. The noise floor on 20m was S5— not so good.  It seems that today’s RV enthusiast brings along complete wireless network support with internet access points, WiFi routers, and their associated Part 15 emissions. Oh, well.

After setting up on 20m SSB, K0JJW and I both completed 10 QSOs with some difficulty. We were clearly being heard but we had trouble digging signals out of the noise.

Next up was a VHF SOTA activation on Signal Mountain (W7Y/TT-161). This is an easy-to-access drive-up summit with a great view, highly recommended with or without a SOTA activation. We debated on whether to use HF for SOTA on this trip. Normally, we’ve stuck to VHF/UHF on SOTA summits, as part of the Height-Above-Average-Terrain experience. However, knowing that Northwest Wyoming is a bit sparse for VHF activity, we could easily get skunked on a SOTA activation (less than 4 QSOs). Despite that, we opted to stick with VHF for SOTA and focus on a successful activation (1 QSO or more), with or without the SOTA points. On Signal Mountain, we worked two stations on 2m FM, including Steven/KB7ITU in Rexburg, ID, about 60 miles away. (Hey, we worked another state on VHF!)

Speaking of VHF, we used our dualband mobile (IC-2730A) to listen to the national park repeaters while we travelled through the park. Our dual-receive radio always has 146.52 MHz on one side and “something else” on the other side. When inside large national parks, we’ll set the second receiver to a national park frequency. These are generally conventional FM in the 162 to 173 MHz range. I won’t list the Teton and Yellowstone frequencies here but you can find them with a little searching on the interwebz. For example, see wiki.radioreference.com for Yellowstone NP frequencies.

Yellowstone National Park

Yellowstone ( POTA K-0070 ) had only 22 POTA activations, not that many considering it is the nation’s first national park. It also has quite a number of SOTA summits of varying difficulty.

We camped two nights at Grant Village campground, a basic national park campground. The campground had no hookups but the campsites are well spaced with many trees and flush toilets. (The only problem we had was when the park service booked another group of campers onto our campsite one night.)

Joyce and our RV (Rocky Victoria) at the Grant Village campsite.

During a previous visit to Yellowstone, we activated Lake Butte (W7Y/PA-219). On this trip, we had our eye on Mount Washburn (W7Y/PA-163), a well-known 10k summit and popular hike, but the road that provides access to it was closed for the summer due to construction. (OK, maybe next time.)

Bob/K0NR operates 2m FM from the unnamed summit W7Y/TT-139.

Instead, we decided to try an unnamed summit 8770 (W7Y/TT-139) that was relatively easy to access but had not been activated for SOTA. We found some trip reports that said there is a nice trail to the summit and the only complaint was that the summit does not have a view due to the many trees.  We parked at the Divide Trailhead, about 12 miles west of Grant Village. The trail is 1.8 miles in length (one way) with 700 feet of elevation gain. So not too difficult but a real hike.  The summit is broad and sure enough with lots of trees, so no view. Practice normal bear precautions on this trail.

Practice standard bear precautions in this area.

Again, we opted for VHF SOTA, knowing that we might not get enough radio contacts for points…but we only needed one contact to qualify as the first activation. We worked two mobile stations passing through the park on 146.52 MHz. Yes, it is good to always be monitoring the calling frequency. You never know who is going to show up.

For POTA, we noted that the Continental Divide Trail National Scenic Trail (K-4558) passes through Yellowstone NP, which would allow for a double activation.  The CDT has always been special to me as it passes through Colorado and provides some of the most scenic hiking in the state. It only had 15 activations listed at that time, two of those were ours from when we activated it a month earlier, in Colorado. We choose the Old Faithful area as a good place to activate Yellowstone NP ( K-0070) and the CDT. We set up near the edge of the parking lot, away from the crowds. Again it was the FT-991 driving the endfed halfwave on 20m SSB. It was midday, so we expected good 20m propagation (and a nice pileup for Yellowstone) but the band was not cooperating. We both made at least 10 QSOs for a successful activation, so we count that as a win, but the pileup never happened.

Besides the radio operating, we had a good time touring through the park and looking for wildlife. We saw tons of buffalo, not quite so many elk and deer, but no bears or wolves. We have had better wildlife viewing on previous trips but it was still fun.

Heading South

Then it was time to start home, heading south out of Yellowstone back through Grand Teton. Of course, we were monitoring 146.52 MHz, when we heard Lorene/KG6MWQ  on unnamed summit 7586 (W7Y/TT-164). She was on the summit with AE6NH, operating both HF and VHF. It was great to catch a VHF activator in Yellowstone. This was the first activation for TT-164, so congratulations to both of them.

Two POTA activators smiling for the camera (Joyce/K0JJW, Bob/K0NR).

We decided to make a stop at the Colter Village area on the way through Grand Teton NP. Our first priority was to use the shower facilities there. Our second priority was doing another POTA activation.

Yaesu FT-991 set up on small camp table, with microphone and two sets of headphones.

This time we set up in a large parking lot, away from anything that might produce RFI. Again, it was 20m SSB using the halfwave antenna supported by a fishing pole. We sat near the RV on our camp chairs and table. Our typical configuration is to have two sets of headphones so both of us can copy well. We just use the standard handheld microphone which is easily passed between us when we change operators.

Typical antenna setup with fishing pole inserted into a plastic pipe attached to the RV ladder. A wire antenna is hung from the end of the pole.

Later in the day, we exited the park and headed south through Jackson, WY. We stayed overnight at a farm near Afton, WY which is surrounded by Bridger-Teton National Forest (K-4535). Of course, we needed to do one more POTA activation. We searched around for a usable spot to park and then fired up on 20m SSB. Propagation was OK but not great but we got it done.

The next day, we were up and going early, driving the rest of the way home to Monument. It was a wonderful road trip that blended sightseeing, hiking, camping, and ham radio. Let’s go do it again!

73 Bob K0NR