Friday, November 29, 2019
SOTA operation in Prague City: Ládví by m0blf
I’ve recently returned from a few days in Prague doing tourism and sightseeing. While the primary focus of the trip wasn’t radio, I noticed that there’s a SOTA summit on the outskirts of the city, which I had to go to.
OK/ST-084: Ládví
Getting to Ládví requires no car hire at all. If you are in Prague (and you should go – it’s a beautiful city), this summit is accessible via public transport.
The only real instruction is to take the metro to Ládví station on the Prague metro, Line C. If you are in the city for a while, you will probably already know that a ticket covering all metro lines, buses and trams on the fantastically integrated transport network costs just 310 CZH (about £10.50) for three days. This means that there is no additional cost to activate this hill.
Ládví station is on the northern outskirts of Prague city. You come up out of the underground into a commercial centre with supermarket and also a local street market.

From here, walk along the wide cycle/foot path through the tower blocks – the first tower blocks I’d seen in the trip – over a road, gradually heading up a slight incline. (The road is Žernosecká; it’s not particularly busy and there’s a pedestrian crossing.)

The path soon gives way to a narrow path which splits. You can go up either route, but I headed right, through the trees. Again, this isn’t a particularly steep path, nor was it very slippery despite the damp autumn leaves on the ground. In fact, there’s a layer of tarmac underneath the path but a thin layer of mud had built up in places. Near the top of the ascent, you are inside the activation zone. You can normally turn left to reach the official summit, but on my visit it was taped off due to tree felling.

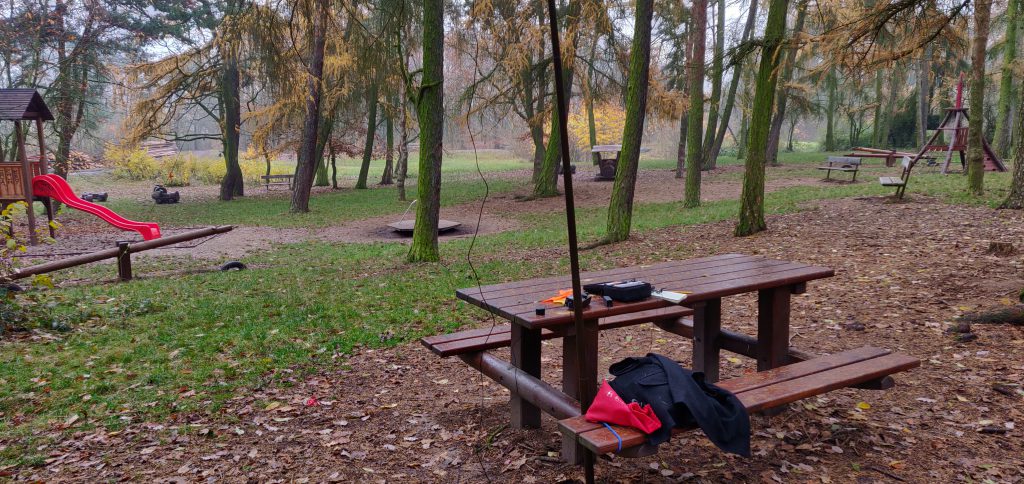
Instead, I headed right to the children’s play area, where there’s a useful bench, about fifteen minutes’ walk from the metro stop. Here, I was able to use bungees to hold up my fibreglass pole and soon had set up the gear.
But something wasn’t right. My antenna didn’t really sound like an antenna. I wasn’t getting spotted by the RBN, even enabling the ATU in my KX2 there were SWR problems, and after too long calling CQ to no avail, I spent more time fault-finding. It eventually transpired that the problem was an easy one: a patch lead had become intermittent. Holding it in exactly the right place solved the issues and this was good enough to get 3 QSOs on 20m and 3 on 30m, enough to get the one point the hill is worth.
This is a lovely little hill to activate and a wonderful way to spend a half-day while in the area.


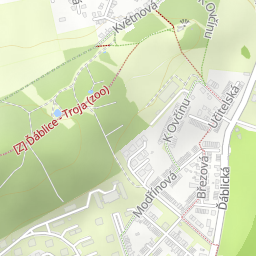


Leaflet | © OpenStreetMap contributors, Map data © OpenStreetMap contributors, CC-BY-SA, Imagery © Mapbox
Total distance: 2931 m
Total climbing: 0 m
DownloadTotal climbing: 0 m
RV Electrical: All the Basics You Need To Know! By Amy
Your RV electrical system is what allows you to utilize many of the modern conveniences that you’ve become accustomed to, from overhead lighting and vent fans to your HVAC system and refrigerator. And as awesome as it is to have access to all that stuff on the road, if you want it to keep working smoothly without interruption, it helps to have a basic understanding of how your RV’s electrical systems work.
If you plan to use your RV on a regular basis (and especially if you’re going to live in one full time), a basic understanding of RV wiring and power sources can help you make informed decisions about where to draw power from — and also help you troubleshoot if something does go wrong.
We realize that the majority of RVers are not electrical engineers, so we won’t get too technical (i.e. you won’t learn how to rewire your entire RV — this isn’t RV wiring for dummies!). However, we will give you some baseline knowledge and vocabulary on RV wiring so that you can understand what’s going on with all of your batteries, panels, wires, and cables. Read on.
How Does Electricity Work in an RV?
Whether you’re in an RV or your home, you will never have access to an unlimited amount of electrical power. Therefore, it’s a good idea to review a formula you learned in high school but have probably long since forgotten. Watts, or overall power, is a product of current, or amps, and voltage. As an equation, it’s written as: watts = amps x volts, or W = A x V. If you want to know how many different electrical devices you can have on at one time in your RV (or in your home, for that matter), this formula will tell you. As long as you stay under the amount of available wattage, your circuits will run smoothly. Exceed your available wattage, and you’ll trip your RV electrical system’s circuit — which you may know first-hand if you’ve ever tried to run your microwave and hair dryer at the same time!
We should also briefly cover the difference between AC and DC electrical systems, since your RV has both! In a DC system, the electricity only flows in one direction (which is why it’s called a Direct Current system). With AC electricity, on the other hand, the current changes directions periodically — which is why it’s called an Alternating Current.
One RV, Two Electrical Systems
Your RV has two separate electrical systems: a 12-volt DC electrical system and a 120-volt AC system. The 12-volt system is powered by a battery (or in some cases, multiple batteries), and it powers things such as the start-up on your water heater, furnace, and refrigerator, plus most of the lights in your RV’s living space, your water pump, your carbon monoxide detector, and a number of other things. The 120-volt system is powered by an RV electrical hookup plug or a generator, and it powers daily use items like kitchen appliances, your TV, and other large electrical appliances.
RV Power Sources: The Low-Down on Batteries
Your RV’s 12-volt system needs to have a total of — you guessed it — 12 volts. This can be achieved with a single 12-volt battery or several 12-volt batteries wired together in a parallel circuit. However, using two 6-volt batteries wired together in a series circuit (to essentially create a 12-volt battery) is typically better than using a single 12-volt battery. This configuration will usually give you a much longer battery life, or what’s referred to as a deeper discharge time. The trade-off for using two 6-volt batteries is that two batteries take up more space than one. However, that trade-off may be worth it if your camping needs require that extended battery life.
When you’re plugged into a campground RV electrical pedestal (or any power source), your 12-volt battery (or batteries) automatically charges. If you’re boondocking or dry camping, and not plugged in, you can use your batteries to power anything that runs off 12-volt. Adding an inverter to the mix will convert the 12-volt battery’s direct current to a 120-volt alternating current so you can power appliances that need 120 volts and use your vehicles electrical outlets. It’s good to know how much discharge time you have, since your RV’s 12-volt system, like all batteries, will eventually run out of juice and need to be recharged.
30 Amp or 50 Amp?
Almost all RVs come with a power cord to plug into the electrical pedestal at a campground (developed campgrounds with available hookups, anyway). This is also known as a “shore power” connection. These power cords come in two amperages: 30-amp and 50-amp. A 30-amp cord has three prongs, and a 50-amp has four. Obviously, if you’ve got a 50-amp hookup, you can use a lot more electricity at one time than you could if you have just a 30-amp hookup. *Remember to refer to the electricity formula at the beginning of this post for how much more power you’ve got.


While many campgrounds do have RV electrical hook ups for both 50-amp and 30-amp cords, some campgrounds have only 30-amp hookups available. Therefore, it’s a good idea to invest $20 or so in a 50 amp to 30 amp adapter. Keep in mind that if you’re adapting your amperage down to 30, you won’t be able to use as much electricity as you would have if you were plugged in at 50. Also, you want to use the shortest adapter and extension cords possible to avoid a voltage drop. Finally, while an RV with 50-amp capacity can be adapted to use a 30-amp cord, an RV with only 30-amp capacity can never be adapted to use a 50-amp cord.
Before You Plug In Your RV Electrical Hookup
When you pull into your campground site, it’s tempting to plug right in and turn everything on. However, you want to keep safety in mind, especially when dealing with electricity. First, it’s a good idea to test the hook up with a polarity tester to make sure the campground’s wiring is in good shape. If it’s not, your polarity tester will tell you before you fry any or all of the components of your RV electrical system. This is a relatively common and affordable tool that can be purchased for $40 or less, and it’s a great insurance policy against inadvertent damage to your RV electrical wiring.
Next, before you plug in, take a few safety precautions and switch everything off — both your RV’s electrical system and the RV electrical pedestal. Make sure everything connected to any interior RV electrical outlet is powered off, too. Once your power cord is firmly plugged in, then switch them on. You might also consider installing a surge guard to protect your RV’s electrical system against potentially damaging surges. These cost a few hundred bucks, but again, it’s insurance against a bigger, more destructive problem.
Know Your RV’s Electricity Hogs

Not everything you plug in will draw the same amount of electricity. Some devices run quite well on very little power, while others are big draws on your available power. In general, anything that generates heat or gets cold will draw a lot of power, and you can’t run too many of these at once. This is especially the case if you’ve got a 30-amp power cord.
Most of your kitchen appliances use a lot of electricity. Your microwave, coffee maker, and toaster are all electricity hogs. Air conditioning units also pull a lot of power, too. Also, bathroom devices like hair dryers and curling irons use a lot of electricity. Items like your TV and stereo, though, use considerably less power.
RV Generators
If you don’t have the option to hook up to shore power as you would at a developed campground, you can still generate the power you need to enjoy your electrical appliances… if you’ve got a generator, that is. Many large motorhomes come with a propane-operated generator pre-installed, but with smaller motorhomes and travel trailers, you may need to purchase one aftermarket.
The generator will create AC power, which will run your 120-volt system and allow you to utilize those bigger, daily-life appliances like your HVAC system and refrigerator. That said, many boondockers prefer not to use a generator due to the cost of propane as well as the sound of its operation and smell of its exhaust, which leads us to another option.
RV Solar and Wind Options

If you’re an RVer who likes the idea of camping off the grid, or you enjoy public campgrounds than may not offer power hook-ups, you might consider using solar panels to power your RV and charge your batteries. This is an especially great option for RVers who prefer boondocking, or dry camping, as there’s never really any need to plug in. RV solar panels come in a variety of sizes, and they’re all rated according to how many watts of energy they produce. Bigger RVs need more panels, and they’ve got the roof space for them. Solar panels get wired directly to the battery and inverter/charger unit, so while there’s some upfront work to get them up and running, the big benefit is that you can be almost totally self-reliant for your electrical needs.
Keep in mind that you will need an inverter in order to transform the power your solar panels generate into the electrical current your RV’s appliances need to run. And although solar power can help you generate enough electricity for most small appliances, it’s pretty tough to run your air conditioning on solar alone, for instance — and besides, if you’re boondocking, isn’t it more fun to head to a destination where the weather’s already awesome?
RV Electrical Maintenance and Troubleshooting
Regular maintenance and inspection is the easiest way to spot a small problem before it becomes a big issue. On a frequent basis take a look at your batteries and all of their connections. A good time might be just before you depart on a trip. Check to make sure that all of the connection points are secure, nothing looks damaged or frayed, and everything is clean with no signs of corrosion. If you see something that looks off, it’s a good idea to have it checked out.
If you’re using lead-acid batteries, you’ll need to check the electrolyte levels and add water from time to time. However, more modern deep-cycle batteries, as well as lithium batteries, help circumvent this maintenance need, and can also extend the life of your batteries.
Additionally, know where the RV electrical panels are in your motorhome. If something’s not powering up as it should, first look to see if a circuit is tripped or if a fuse is blown. You can usually see if a fuse is blown, but sometimes you can’t. In that case, you can use a small test light that will illuminate if a fuse is good. If you replace a fuse and it blows right away, that’s a good sign that there’s a bigger problem. You can also try to follow power lines to determine if there’s a connection issue, though these can often be hard to find without professional help.
Always Use Extreme Caution With Electricity
If you’re comfortable doing electrical work, then you already know the safety precautions to take: turn off power at the source before working, treat all wires as if they’re live, use tools with non-conducting handles, and so on. However, if you’re not confident about your ability to work with electricity, don’t take chances with your RV or with your life. Get your vehicle serviced only by individuals who are knowledgeable and experienced in RV electrical repair.
In a perfect world, you’d just plug whatever you wanted into your RV’s outlets, and they’d work. You wouldn’t have to think about current, you wouldn’t be concerned about voltage, and your batteries would always be fully charged. While we of course don’t live in a perfect world, your RV electrical system can, for the most part, stay out of your way and let you power what you want without giving you too much trouble. However, it’s still good to know the basics of how the current is flowing and how your RV electrical system works.
And, we can’t say it enough – don’t take chances with electricity in your RV. It’s a powerful force, and it’s deadly in the wrong hands. If you’re not comfortable doing a repair, if an RV electrical connection seems faulty, or if you’ve got concerns about your batteries or wiring, have an experienced professional take a look. It could save your RV, it could save your budget, and in serious situations, it could save your life.
This post may contain affiliate links.
Gear List: Alta Via 1 and 2 (Dolomites, Italy) Posted on November 19, 2019 by Cam
I hiked Italy’s Alta Via 1 and 2 back-to-back over 10 days in mid-September, 2019. The conditions I encountered were typical for that time of year, with temps ranging from low 20’s C to just below just below freezing.
Overall I was happy with my gear selections for the Alta Vias. I was never uncomfortable at any stage during the hike (s), and felt prepared for any meteorological scenario that may have occurred. I could have got by with my Katabatic Palisade 30 quilt instead of the Alsek 22, however, due to the fact that I was still had a month of Alps hiking to go, the latter was definitely the right overall option for the trip.
My base weight for the Alta Via 1 and 2 was 7.4 lbs (3.4 kg), and the total weight came in at 10.3 lb (4.7 kg).
(Note: For planning information on the AV2, see A Quick and Dirty Guide to the Alta Via 2).
| ITEM | WT. (OZ) | SUB (oz) | SUB (kg) | COMMENTS |
| BACKPACK | ||||
| MLD Burn DCF | 16 | UL, frameless, slim profile – I’ve been using different incarnations of the Burn for over a decade / I’ve had the DCF model for the past two years – so far, so good. | ||
| Pack Liner (Trash Compactor Bag) | 2 | Cheap & effective | ||
| 18 | 0.51 | |||
| SHELTER | ||||
| Tarptent Aeon Li | 16.8 | Uber-lite, holds up well in a storm when pitched low (108cm), and very roomy for something which weighs around a pound. | ||
| Stakes – Easton “Nail” models (6) | 1.7 | |||
| 18.5 | 0.52 | |||
| SLEEPING SYSTEM | ||||
| Pad – Thermarest NeoAir XLite (Sm) | 8 | Very comfy / Doubles as makeshift framesheet for pack / Put feet on backpack when sleeping / See 20,000 + mile review. | ||
| Quilt – Katabatic Alsek 22 (Long / 900fp) | 22.2 | Second season using the Alsek / Conservatively rated 22°F / More than 900 nights using Katabatic quilts since 2011. | ||
| 30.2 | 0.86 | |||
| KITCHEN | ||||
| LokSak 20×12 (Food Bag) | 1.2 | |||
| Food Vessel: Reconstituted sealable granola pouch. | 0.3 | I ate virtually all of my breakfasts and lunches at the huts (and would often get a sandwich or two to go for dinners), so I only used this a few times for muesli and powdered milk. | ||
| Plastic spoon | 0.2 | Picked this up in a Greek restaurant last year. Can’t believe it hasn’t snapped. | ||
| SmartWater Bottles 1 LT (2) | 2.6 | |||
| 4.3 | 0.12 | |||
| FIRST AID / HYGIENE | ||||
| Sunscreen (repackaged in tiny btle.) | ||||
| Hand Sanitizer (repackaged in dropper btle.) | It’s been 20 years since I’ve had a case of the trotskies in the backcountry. I think a big reason is my diligent use of hand sanitizer. | |||
| Aquamira (repackaged in dropper btles.) | Purification method of choice since 2007. | |||
| Mini Toothbrush | ||||
| Toothpaste (mini tube) | ||||
| Dental Floss | Doubles as sewing thread | |||
| Antiseptic Wipes (2) | Clean cuts / wounds | |||
| Gauze | ||||
| Triple Antibiotic Cream (tiny tube) | ||||
| 3M Micropore Medical Tape | Breathable, paper tape / Adheres well. | |||
| Ibuprofun (6) | ||||
| Sewing Needle | One armed blind people can sew better than I can. | |||
| Tenacious Tape, Mini Tube Super Glue (repairs) | To compensate for lack of sewing skills. | |||
| 4 | 0.11 | |||
| CLOTHES | ||||
| Rain Pants – Montbell Versalite | 3.2 | Very light, water resistant, but not the most durable. Fine for on-trail hiking, care needed when heading off-trail/bushwhacking. | ||
| Rain Jacket – Montbell Torrent Flier | 6.5 | Newest incarnation of the Torrent Flier. A couple of ounces lighter than the older model. Ideal for on-trail – better than the Versalite. For off-trail I prefer the heavier 3-Layer Montbell Storm Cruiser. | ||
| Insulation – Montbell Chameece Inner Jacket (No longer made/Replaced by Montbell Chameece Jacket) | 8.8 | I’ve owned this fleece for the last four years / Ideal summer insulation layer for the Alps– not too heavy, performs well when damp, takes the edge off chilly mornings. | ||
| Extra Socks – Darn Tough Hiker Micro Crew | 2.6 | |||
| Buff (Original Polyester) | 1.4 | Beanie, neck/face protection, condensation wipe, convenience store holdups if low on cash / I came late to the Buff party, but I’ve got to say I’m impressed. | ||
| Montbell Chameece Liner gloves | 0.9 | Almost four years of regular use and still going strong / Easily the best liner gloves I’ve used, and it’s not even close. | ||
| 23.4 | 0.66 | |||
| MISCELLANEOUS | ||||
| Phone – Samsung Galaxy S7 | 5.3 | Unlocked / Photos, videos, journalling, backup light, GPS / Battery starting to go / Need to upgrade next year. | ||
| Stuff sacks – HMG Cuben Fiber (2) | 2.4 | |||
| Montbell Power Head Lamp | 1.9 | Four settings, good battery life | 200 Lumens – 90 m / Double click feature to prevent it accidentally turning on / I’ve been using this head lamp for four years and it’s still going strong. | ||
| Montbell Trail Wallet (orange model) | 0.5 | Love this little wallet. Use it both on trail and off. Upgrade from the plastic card holder. | ||
| Swiss Army Classic | 1.3 | For a long time I really only used the tweezers and scissors, but in recent years I’ve carried more cheese and veggies on shorter hikes, meaning that I now use the knife as much, or more than the other two features. | ||
| Compass – Suunto M-3G Global Pro | 1.6 | Adjustable declination and globally balanced needle (more responsive than my old Suunto M-2). | ||
| Small pen | 0.3 | Notes on maps / journal. | ||
| Map Bag – Quart Size Ziploc | 0.2 | Keeps maps clean, dry & organized. | ||
| Montbell Alpine Carbon Pole Cam Lock | 7.1 | Upgrade after many years of using the Fizans, due to the fact that I’ve had the twist-lock mechanism fail on me a couple of times in extreme conditions / Cam (flip) lock easier to handle, more secure, and worth the extra ounce and a half. | ||
| 20.6 | 0.58 | |||
| BASE WEIGHT | TOTAL | 7.4 lbs | 3.4 kg | |
| ITEMS WORN | ||||
| Shorts – Patagonia Baggies 7″ | 7.9 | Hiking shorts of choice since 2014/15. 7″ are long enough that they can be used on trail, but still look respectable around town. See Review. | ||
| Base layer – Montbell Cool Hoodie | 6.6 | This was the first sun hoodie I’ve ever tried and I have to say I loved it. Light, airy, dries quickly, the kangaroo pouch was handy for snacks/phone/map, and when combined with the baseball cap, it provided great sun protection. | ||
| Hat – CDT Baseball Cap | 3.2 | |||
| Shoes – Brooks Cascadia 13 | 23.6 | I’ve worn every model of the Cascadias since the 3’s, which came out more than a decade ago. Since that time I’ve tried Altras, La Sportivas and a couple of other different brands, but I always come back to the Cascadias. | ||
| Socks – REI Merino Wool liners | 1.6 | Still my favourite liner socks, though the current models aren’t as durable as the pre-2013 versions. | ||
| Dirty Girl Gaiters | 1.2 | Handy for keeping out dirt and mud. I’ve been rocking DG’s since 2007. | ||
| Timex Ironman Watch | 1.4 | Cheap, durable, light, multiple alarms | ||
| Sunglasses | 0.8 | Polarized lenses, 100% UV protection, wrap around. | ||
| 46.3 | 1.31 | |||
| TOTAL WEIGHT | 10.3 lb | 4.7 kg | ||
Disclosure: This post contains some affiliate links, which means The Hiking Life receives a small commission if you purchase an item after clicking on one of the links. This comes at no additional cost to the reader, and helps to support the website in its continuing goal to create quality content for backpackers and hikers.
Subscribe to:
Posts (Atom)