Friday, January 31, 2020

HIKE YOUR BEST HIKE WITH TREKKING POLES by Angie Rogers

On a beautiful day a few years ago, Shane and I were on a day hike in the Great Smoky Mountain National Park. Three boys who appeared to be elementary school age passed us. The youngest child was probably in kindergarten and the oldest possibly in fifth grade. We overheard one of the younger boys ask their older brother what in the world were the sticks in Shane and my hands. The oldest child replied, “Those are trekking poles that OLD people use when they go hiking.” At this time, Shane and I were in our early forties, neither of us believing that we are old.

So if we were not OLD, then why would we choose to use trekking poles, also known as hiking poles, when we hike?
Trekking poles for all ages

Increased Stability

Plain and simple, trekking poles save you from many, many falls by increasing your stability. During my 100-mile Great Smoky Mountain National Park thru-hike this past fall, my only fall was when I put away one of my trekking poles to carry my umbrella. Having the poles to catch you when you trip over a rock, root, or even the simple ground will save you many bumps and bruises and possibly a broken bone.

Oh My Aching Knees

Trekking poles not only offer you more stability but also help your knees. They can reduce the impact on your knees by up to 30% – particularly on those long, steep down hills. Look for trekking poles with built in shock absorbers. These internal springs can further reduce the impact on your knees when hiking downhill and have a lock out mode for trekking uphill. Shock absorbing poles are great for anyone with previous hip, knee, or ankle injuries. However, trekking poles with springs will be a little heavier.

Rock Hopping and River Crossings with Trekking Poles

River Crossing with trekking poles
Cross a river using trekking poles and you will be “hooked” on always using them. Trekking poles give you a leg in the water if you are aiming to keep your feet dry. They can be used to help you balance when hopping from rock to rock or when inching along a downed tree across a creek. Trekking poles can also keep you from slipping on the mossy rocks when you are knee deep in the water. Be sure to plant your pole securely before you take each step.

One Pole or Two Trekking Poles

Whether you choose to use one or two poles is personal preference. One pole is a great choice for mostly flat terrain. I prefer two poles for a few reasons:
  1. More likely to fall if I am only using one pole.
  2. Extra pole to use if one pole breaks.
  3. Two trekking poles for setting up my ultra-light tent.
  4. Equal arm workout with a pole in each hand.

Muscle Tone Formation 

When using trekking poles, you turn your hike into a full body workout. Now you are exercising and toning your arms as well as engaging your core muscles, creating strong abs. You will look buff before you know it.

Improved Circulation

Have you ever noticed that your fingers are tight at the end of a full day of hiking? Or maybe you cannot get your rings off after your hike? Believe it or not, trekking poles help eliminate this problem. Trekking poles keep your hands slightly elevated. This slight elevation assists with returning blood flow back to your heart and eliminates blood pooling in your hands, causing them to swell.

Increased Speed 

Those who use trekking poles hike faster. Your mile time will be faster with the entire body engaged, the added stability, and the poles helping to propel you forward. Your legs will not tire as quickly. The miles will fly by.

To increase your speed, use the following step/pole pattern while maintaining a natural arm swing when hiking. Don’t let your poles get too far behind or in front of you. The goal is to plant the tip slightly behind you. This will allow you to push off and propel you forward. This method will take some practice but will eventually become second nature.

Step/Pole Pattern
Left foot down and right pole down at the same time
Right foot down and left pole down at the same time
Repeat this pattern while always keeping the opposite pole and foot touching the ground at the same time. It should feel like a natural stride.
Right Foot and Left Trekking Pole Planted

Proper Trekking Pole Position

Most trekking poles are adjustable in their length. Properly sized trekking poles will improve your posture and reduce stress on your back. To adjust your poles to the correct length for you, bend your elbow to a 90-degree angle. Grab the grip of the pole comfortably in your hand and gently place the tip of the pole on the ground. This is your correct pole length. Lock your poles to this length, but make sure all shaft sections are near equal length. If one section is much longer than the other, the longer section will be a weak link in your pole. This weak section may bend or snap under pressure. If you are 72 inches or taller, choose a trekking pole with a maximum length of at least 51 inches.
Proper 90 degree angel
Some slight adjustments to your pole length may be necessary on long, steep sections. For uphill sections, shorten your poles because the ground is closer to your face. If you start feeling a bit tired in your shoulders, try shortening your poles a little more. For downhill sections, lengthen your poles. The goal is to keep your body in a more upright position for more stability.

"Double Planting" with trekking poles
“Double Planting” with trekking poles
When trekking up or down steep inclines, you may want to try a method commonly called “double planting” with your trekking poles. When using this method, plant both poles at the same time in front of you. Then take a step or two until you are even with your poles.  Once again, plant both poles in front of you and take another step or two. Repeat this method until you have ascended or descended this steep section of trail and no longer need the extra stability.

Locking Mechanisms 

Flick Locks
Twist Locks
There are two common types of trekking poles locking mechanisms: twist lock and flick locks. I have used them both. I prefer the flick locks. Flick locks are a clamp-like mechanism. They are quick and easy to adjust even with gloves on. Flick locks will also withstand freezing temperatures.

Aluminum or Carbon 

Aluminum trekking poles are durable and easy on the back account. They tend to bend before breaking and are perfect for strenuous, rugged terrain.

Carbon trekking poles are lighter than aluminum trekking poles; therefore, carbon poles make an excellent choice for long-mileage treks. However, carbon poles are pricey. They are more vulnerable to breaking or splintering when compared to aluminum trekking poles. Replace your carbon poles immediately if they are ever dented.

Warranty 

When shopping for trekking poles, be sure to look at the poles’ warranty. Some companies are better than others with full replacement warranties. Also, look at the availability of replacement parts for servicing your poles. It is worth spending an extra twenty dollars for trekking poles with a good warranty and available spare parts.

Folding vs. Telescoping Trekking Poles

Folding trekking poles are an excellent choice for anyone who may not always want to use their poles, for fast hikers, or for hikers who are carrying lightweight or ultra-light weight packs. These poles fold like tent poles to a length of around 13 inches. They are lightweight and extremely packable.
Collapsed Folding Trekking Pole
Telescoping trekking poles are the most common trekking poles on the market. They are also the most durable trekking poles on the market. They compact down to a length of around 24 inches and are best stored strapped to the outside of your pack when not in use.
Collapsed Telescoping Trekking Pole

Ultra-light Trekking Poles

Trekking poles that weigh less than one pound are considered ultra-light trekking poles. The advantages of the ultra-light poles include: less arm fatigue, easier and quicker movement, and conservation of energy.  Just like a lightweight pack allows for quicker and easier miles, so do lightweight trekking poles.

Grips Types on Trekking Poles

Cook and Rubber Grips
The three most common types of trekking pole grips are cork, foam, and rubber.
Cork grips are moisture and smell resistant. They are antimicrobial. They conform to your hands. These grips are excellent for hikers with sweaty hands, or for any hiker trekking in hot weather. Unfortunately, cork grips are pricier than the other grip options; however, these are my preferred grips.

Foam grips are soft and comfortable to hold. They are the lightest grip on the market. However, they do absorb moisture and will become wet and squishy. They will also freeze in cold weather, making them less than an ideal option for cold winter hikes.

Rubber grips are ideal for winter hiking. They insulate your hands from the cold. They are also water resistant. These grips are the heaviest grip when compared to cork and foam. Rubber grips are not ideal for warm weather hiking. Hand chaffing will occur if used over long periods with sweaty hands.

Wrist Straps on Trekking Poles

There is a “right” way to use the wrist straps on your trekking poles. Using the wrist straps correctly will transfer the pressure from your hands to your forearms, help prevent blisters, and may save your thumbs from injury if you fall. Properly adjusted wrist straps support your wrists and the heel of your hands. A properly adjusted strap allows you to lightly hold the trekking pole with a relaxed grip. Using the wrist straps properly will help prevent hand fatigue.

Adjust your wrist straps properly by following these steps:
  1. Put your hand through the appropriate strap (some poles have specific left and right straps) from the bottom. The strap should rest around your wrist.
  2. Pull down and grab the grip and the top of the strap with your hand.
  3. Adjust the strap to be tight enough to support the weight of your hand on the pole. You should be able to let go of the pole to reach for a snack and easily grab your trekking pole again with your hand placement in the perfect spot. The strap should not be so tight that it restricts your circulation or is difficult to remove off your hand.
   
Look for straps with fleece or soft lining on the inside of the straps to reduce friction and chaffing.

Trekking Pole Tips and Ends

Trekking poles come with either metal carbine or steel tips. These blunt, pointed tips help grip the earth and are good to use for added traction on ice. Most tips last about 2000 miles before needing to be replaced.

Most poles also come with rubber ends that slip on top of the metal tips. These rubber ends help protect sensitive areas by reducing impact. Unlike the metal tips, the rubber covers will not dig into the soil or leave marks on rocks. Using the rubber ends also helps prevent wear and tear on the metal tips, prevents damaging your pack when storing the poles, and offers improved traction on rock, pavement, cobblestones, and concrete.

Angled or rounded rubber ends are available for purchase and recommended if most of your trekking is on pavement or groomed environments.

Trekking poles also come with removable trekking baskets. These baskets are designed to prevent your trekking poles from sinking too deep into the ground. Wider baskets can be purchased for use in snow or mud, making them the ideal trekking pole end for winter trekking.

When purchasing additional or replacements trekking pole tips and ends, be sure to check for brand compatibility. Not all components will fit on all poles.

Personal Protection with Trekking Poles

"Defensive Posturing" with trekking poles
“Defensive Posturing” with trekking poles
Trekking poles are great for stability and speed, but their uses do not end there.

Have you ever been the first person on a hiking trail early in the morning? What do you repeatedly encounter? That’s right – spider webs. With trekking poles in your hands, you now have a defense against these pesky spider webs. Extend your arms in front of you and wave your poles, knocking down the spider’s hard work. With this technique, no more spider webs will be draped across your face.

This waving technique can also be useful when you encounter a black bear. Holding your poles in the air, waving them frantically around, and clacking them together will give you a big and loud appearance. Hopefully, these actions will scare the black bear away.

Trekking poles may also scare snakes away from your path before you step on them. Snakes may feel the extra vibrations made from the trekking poles. And the poles may be placed near them before your foot. Both of these actions may help alert you and the snake to each other’s presence.

Versatility of Trekking Poles

Have you ever encountered that interesting mass on the ground or that muddy section that you are not quite sure how deep it is? With your trekking poles, now you have a poker and official ground tester.

Trekking poles can also be used in place of tent poles with some tent and tarp shelter set-ups. Leaving your tent poles at home saves weight and gives you another reason to use trekking poles.

Another creative use for trekking poles is during treatment of a sprained, strained, or broken wrist or ankle. Trekking poles are helpful in creating arm and leg splints. Just be sure to pad the area between the victim’s skin and the trekking poles really, really well.

Lastly, if you are a photographer or videographer, trekking poles can be used as monopods. Attachments may also be purchased to hold your action camera, creating an instant Selfie Stick.

Advantages of Trekking Poles

Let’s review all the advantages to using trekking poles:
  • Improved balance and stability
  • Boosted workout
  • Enhanced circulation
  • Increased speed
  • Safeguarded path
  • Lightened backpack
  • Stabilized photos and videos
Trekking poles for EVERYONE!
You do not need to be over forty to use trekking poles on your hike. Trekking poles are truly for everyone – no matter your age or fitness level. They even make trekking poles for kids. So, grab your trekking poles and go hiking. Your mind and body will thank you.

Hike with Trekking Poles with a Guide

Guided day hiking and backpacking trips are available. These trips are a stress-free and exciting way to try out gear like trekking poles. The tour company handles permits, gear, transportation, meals, and provides a professional guide so you can focus 100% on enjoying your adventure. Read more…
How Viral Pandemic Benefits The Globalist Agenda

How Viral Pandemic Benefits The Globalist Agenda

CHEAP AND EASY HYDROGEN LINE RADIO ASTRONOMY WITH AN RTL-SDR, WIFI PARABOLIC GRID DISH, LNA AND SDRSHARP from https://www.rtl-sdr.com/

We've recently been testing methods to help budding amateur radio astronomers get into the hobby cheaply and easily. We have found that a low cost 2.4 GHz 100 cm x 60 cm parabolic WiFi grid antenna, combined with an RTL-SDR and LNA is sufficient to detect the hydrogen line peak and doppler shifts of the galactic plane. This means that you can create backyard hydrogen line radio telescope for less than US$200, with no complicated construction required.
If you don't know what the hydrogen line is, we'll explain it here. Hydrogen atoms randomly emit photons at a wavelength of 21cm (1420.4058 MHz). Normally a single hydrogen atom will only very rarely emit a photon, but the galaxy and even empty space is filled with many hydrogen atoms, so the average effect is an observable RF power spike at ~1420.4058 MHz. By pointing a radio telescope at the night sky and averaging the RF power over time, a power spike indicating the hydrogen line can be observed in a frequency spectrum plot. This can be used for some interesting experiments, for example you could measure the size and shape of our galaxy. Thicker areas of the galaxy will have more hydrogen and thus a larger spike, whereas the spike will be significantly smaller when pointing at empty space. You can also measure the rotational speed of our galaxy by noting the frequency doppler shift.
The 2.4 GHz parabolic WiFi grid dishes can be found for a cheap at US$49.99 on eBay and for around US$75 on Amazon. Outside of the USA they are typically carried by local wireless communications stores or the local eBay/Amazon equivalent. If you're buying one, be sure to get the 2.4 GHz version and NOT the 5 GHz version. If you can find 1.9 GHz parabolic grid dish, then this is also a good choice. Although we haven't tested it, this larger 2.4 GHz grid dish would probably also work and give slightly better results. WiFi grid antennas have been commonly used for GOES and GK-2A geosynchronous weather satellite reception at 2.4 GHz with RTL-SDRs as well and we have a tutorial on that available on our previous post.
These dishes are linearly polarized but that is okay as hydrogen line emissions are randomly polarized. Ideally we would have a dual polarization (NOT circular polarized) feed, but linear appears to be enough and is much simpler. In addition, the 2.4 GHz feed is obviously not designed for 1420 MHz, but just like with GOES at 1.7 GHz the SWR is low enough that it still works.
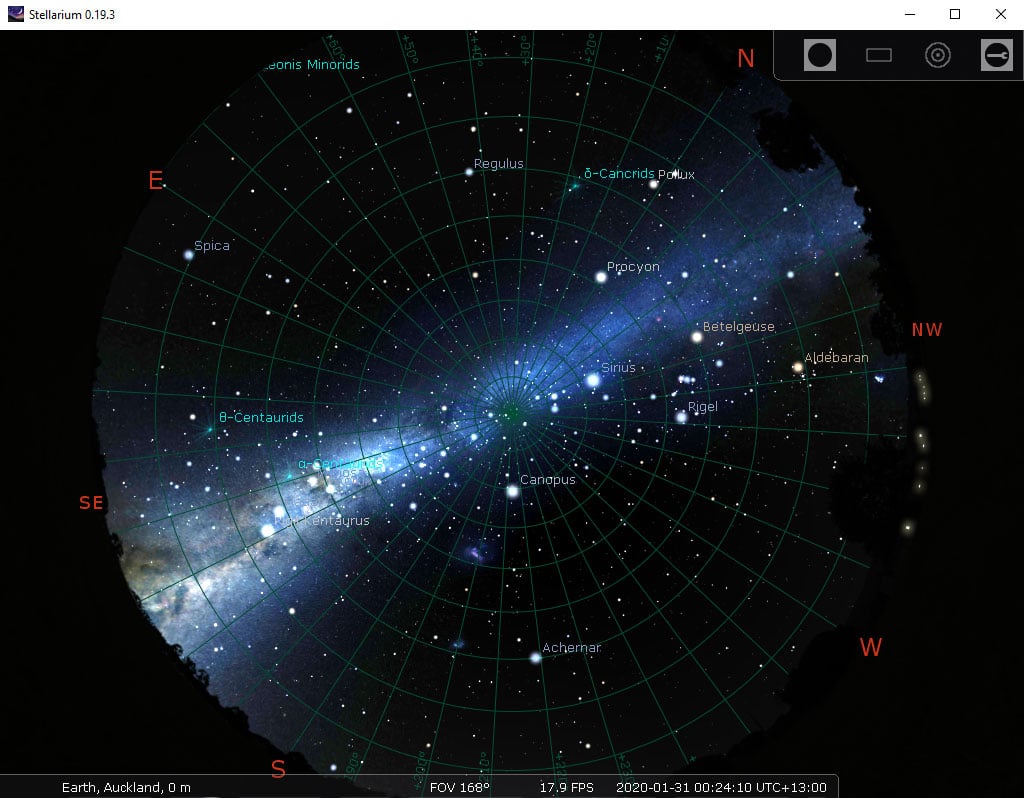
The Gyfcat animation below shows a hydrogen line "drift" scan performed with the 2.4 GHz WiFi dish, an RTL-SDR Blog V3 and a NooElec SAWBird H1 LNA. The scan is performed over one day, and we simply let the rotation of the earth allow the Milky Way to drift over the antenna. The Stellarium software on the left shows the movement of the Milky Way/galactic plane over the course of a day for our location. The dish antenna points straight up into the sky, and we have set Stellarium to look straight up too, so Stellarium sees exactly what our dish antenna is seeing.
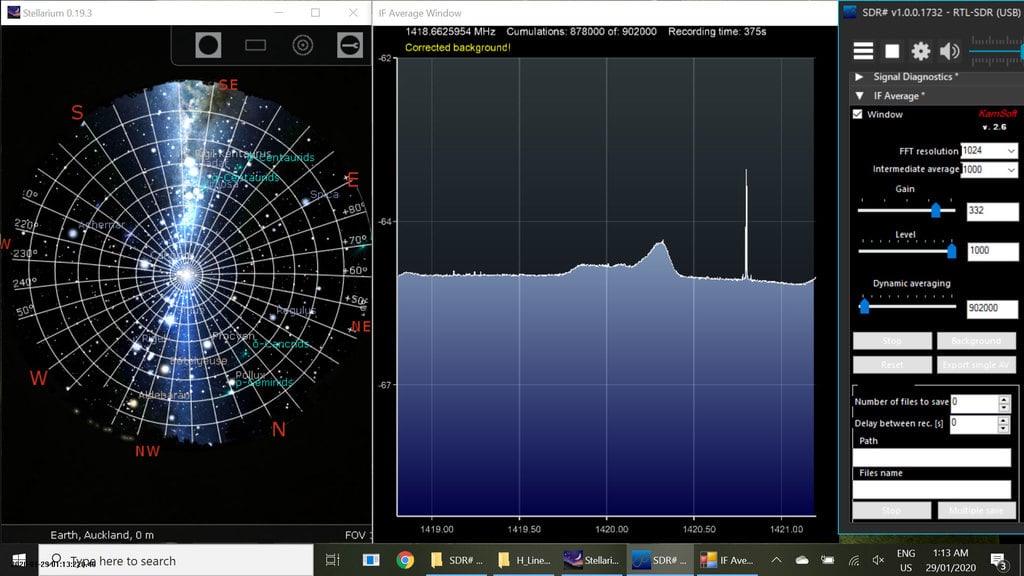
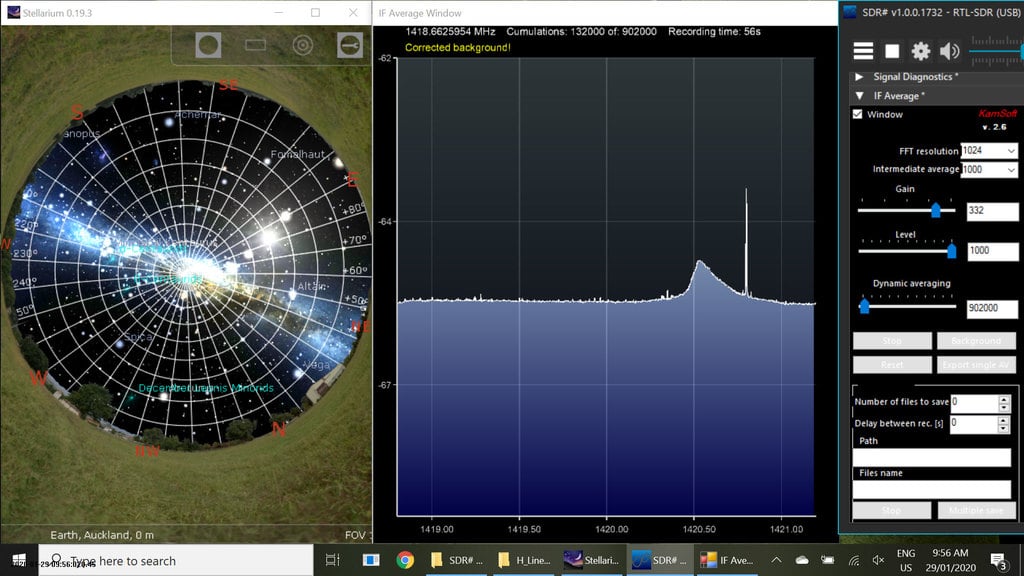
You can clearly see that there is a lump in the radio spectrum at around 1420.40 MHz that grows when parts of the Milky Way pass over the antenna. This lump is the hydrogen line being detected. As our Milky Way galaxy is filled with significantly more hydrogen than empty space, we see a larger lump when the antenna points at the Milky Way, and only a very small lump when it points away.
It's important to ignore the very narrowband spikes in the spectrum. These narrowband spikes are simply radio interference from electronics from neighbors - probably TVs or monitors as we note that most of the interference occurs during the day. There is also a large constant spike which appears to be an artifact of the LNA. The LNA we used has a 1420 MHz filter built in, but LCD TVs and other electronics in today's suburban environment spew noise all across the spectrum, even at 1420 MHz.
You can also note that the hydrogen line peak is moving around in frequency as different parts of the galaxy pass overhead. This indicates the doppler shift of the part of the galaxy being observed. Because the arms of the galaxy and the hydrogen in it is rotating at significant speeds, the frequency is doppler shifted relative to us.
Using the power and doppler shift data of the hydrogen line is how astronomers first determined the properties of our galaxy like shape, size and rotational speed. If we continued to scan the sky over a few months, we could eventually build up a full map of our galaxy, like what CCERA have done as explained in this previous post.

Hardware Required

  1. 2.4 GHz WiFi parabolic grid dish. (~$50)
     
  2. A low noise amplifier (LNA). This is required to get the noise figure of the receiving system low enough, and the gain high enough.
    1. We recommend using a hydrogen line specific LNA. Good models include the NooElec SAWBird+ H1 ($44.95), or the GPIO labs Hydrogen Line pre-filtered LNA ($49.95). 

      Using a specially made hydrogen line LNA with filtering built in will get you better results compared to a general purpose wideband LNA. It may also be mandatory to use one of these LNAs for those living in areas with strong interfering signals from things like cellular and broadcast FM/TV etc.
       
    2. If you're on a budget, and don't have many strong interfering signals  around you, then you get away with using an unfiltered general purpose wideband LNA like an LNA4ALL or our $19 RTL-SDR Blog wideband LNA.

      We can generally get away with an unfiltered LNA if we point the antenna straight up towards the sky, or at a high elevation. This avoids most terrestrial sources of noise from leaking into the antenna. However, the H-Line specific LNAs are usually very high gain, and very low noise figure, so can work better for this type of experiment.
  3. An RTL-SDR Blog V3, or any other RTL-SDR with a built in bias tee (~$21.95). An Airspy is also a good choice with good supporting software, but costs a lot more.
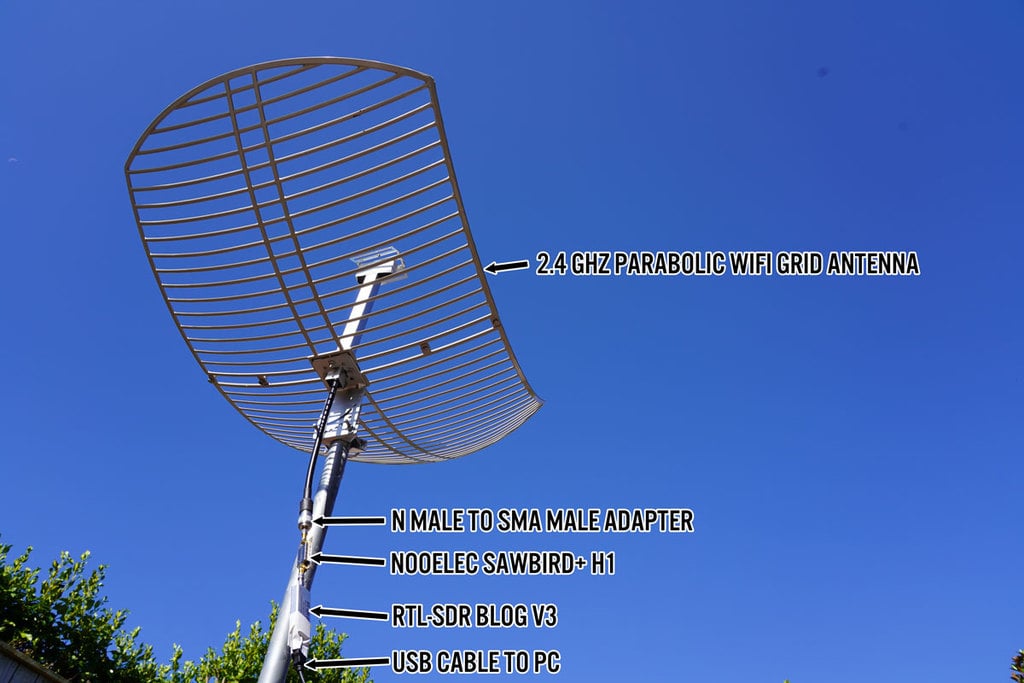
  4. Type N Male to SMA Male adapter (~$7 on Amazon, cheaper elsewhere). Most WiFi grid antennas have an N-female connector so we need to convert to SMA to connect to the RTL-SDR.
     
  5. high quality USB extension cable (~$10), just long enough to get to your PC/laptop. We recommend a high quality USB3.0 spec cable, as these have much lower voltage loss over longer runs. If you're using an active cable, make sure it can handle the voltage drop.
     
  6. Some sort of tripod ($39.99) to mount your dish, or another way to mount it. You could probably even just lay it on the ground.
  7. 50 Ohm terminator ($5.50) (optional but recommended)
     
  8. A Windows PC or Laptop (for this tutorial). A Raspberry Pi could also work with other software or as a TCP server.
  9. Total cost (not including the PC): US$179.40, and probably less if you already have some parts or find similar items priced cheaper elsewhere.

    Hardware Setup

    The recommended setup is simple. Antenna pointed straight up -> LNA -> RTL-SDR -> USB Cable -> PC.
    Cheap and Easy Radio Astronomy Setup with an RTL-SDR and 2.4G WiFi Grid Dish
    Cheap and Easy Radio Astronomy Setup with an RTL-SDR and 2.4 GHz WiFi Grid Dish
    Detailed instructions below:
    1. Construct the WiFi dish. This is just a matter of putting in a few screws to join the two panels and feed. Make sure the feed is mounted with the long axis matched with the grid direction. Also ensure the reflector is installed.
       
    2. Mount the dish outside pointing straight up into the sky. Once you are a little more advanced, you could try other elevations or even motorize it, but start with straight up for now. The rotation of the dish does not really matter as hydrogen line emissions are randomly polarized.
       
    3. Connect the RF side of the LNA to the antenna cable via the N-SMA adapter.
    4. Connect the RTL-SDR to the RF+DC side of the LNA.
    5. Connect a high quality USB cable from the RTL-SDR to your PC. We don't recommend using anything more than a few meters of coax between the LNA and RTL-SDR in order to optimize the signal levels.
      1. Do not use coax between the antenna and LNA. The LNA should be directly connected to the antenna output.
    It may also be wise to waterproof your LNA and RTL-SDR if kept outdoors. This can be as simple as putting it in a plastic bag, or old coke bottle sealed with some putty.

    Software Setup

    In order to detect the hydrogen line we need to use software capable of integrating/averaging many FFT samples over time. Averaging the samples reduces the SDRs quantization noise, allowing the weak hydrogen line peak to be seen. Because the galaxy is moving fairly slowly in the sky, we can safely average for 5-10 minutes at a time.
    For Linux, there are various programs that can be used. PICTOR, and rtl-obs are some good choices, but are a little more complicated to set up. But they have some good features like the ability to properly calibrate the results, and some interesting algorithms that could increase the SNR of the hydrogen line detection.
    For this tutorial we will keep it as simple as possible, and we will use Windows, with SDR# and a SDR# plugin called "IF Average". We will also use a free astronomy program called Stellarium for tracking the Milky Way's galactic plane across the sky.

    Stellarium Setup

    1. Download Stellarium from https://stellarium.org, and download the Windows version using the button up the top.
       
    2. If you opened Stellarium during the day you won't see any stars due to atmosphere simulation. Hit the 'a' key on the keyboard to disable atmosphere.
       
    3. Hit the F4 key to go into the options menu. Here we recommend increasing the brightness of the Milky Way to 6.0, to make it really obvious.
       
    4. We also suggest going to the markings tab, and turning ON the Azimuthal grid, which will provide a marker to Zenith (straight up in the sky).
       
    5. Check the location shown in the bottom left. If it's not right for you, press F6 to set the correct location.
       
    6. Use the mouse wheel or pinch controls to zoom out so that the entire sky is visible. Drag the mouse so that the camera is looking at Zenith (straight up into the sky).
       
    7. As Stellarium will have opened by default in full screen mode, press F11 to go to Windowed mode.
    By clicking on an object within the Milky Way or behind it, you can find out the Galactic coordinates of where in the Galaxy you are pointing. This could be useful for comparing with already known results like those shown here. Right click to remove the info text about that object.
    Stellarium looking straight up into the sky at the Milky Way
    Stellarium looking straight up into the sky at the Milky Way

    SDRSharp with IF Average Plugin Setup 

    INSTALL SDRSHARP, BLOG V3 DRIVERS, AND THE IF AVERAGE PLUGIN

    1. Download the latest version of SDR# from www.airspy.com. Set up SDR# and the RTL-SDR as described in the Quickstart Guide at www.rtl-sdr.com/QSG.
       
    2. For easily activating the bias tee on the RTL-SDR Blog V3, download the special Blog V3 Windows drivers from https://github.com/rtlsdrblog/rtl-sdr-blog/releases.
       
    3. Rename the original rtlsdr.dll file in the SDR# folder to rtlsdr_old.dll.
       
    4. Copy over all the .dll files in the Release.zip file.
       
    5. Rename librtlsdr.dll to rtlsdr.dll.
       
    6. Download the IF average plugin. Unfortunately the author of the plugin has not maintained his website, and the page is now offline. But the plugin is still available on his Dropbox. Go to Download->Direct Download to download it to your PC. We have also decided to mirror the plugin here on the blog server just in case the Dropbox file goes offline.
       
    7. Extract the plugin files from the zip file into the SDR# folder.
       
    8. Open the "Magic sentance.txt" file and copy the <add key...> line.
       
    9. Open plugins.xml with notepad, and copy and paste in the <add key...> line.

    RECEIVING AND AVERAGING THE HYDROGEN LINE FFT

    1. Open SDR#, select the RTL-SDR, press the start button.
       
    2. Adjust the RF Gain slider to the maximum, and check the "Offset Tuning" checkbox to enable the bias tee via the V3 driver hack.
       
    3. Tune to 1420 MHz and use the center tuning button to center the frequency (the button next to the frequency input in SDR#).
       
    4. Now on the left scroll down until you find the IF Average plugin that you installed earlier.
       
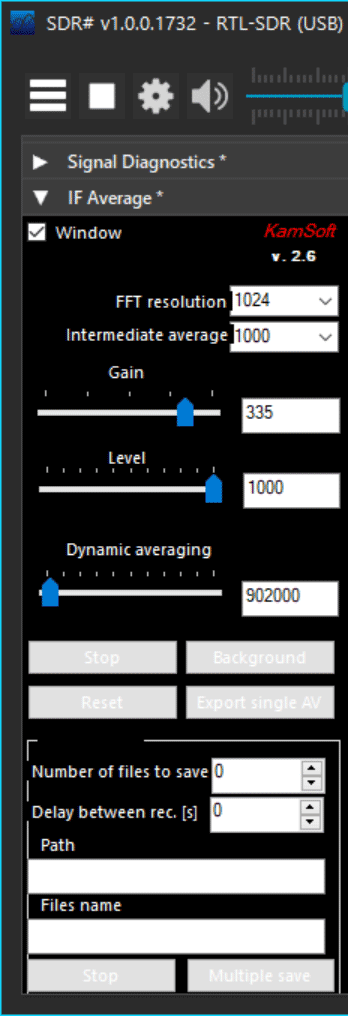
    5. We used the following settings which results in a 6-7 minute averaging time (but shorter averaging times would probably also work - try reducing the dynamic averaging a little):
      1. FFT resolution: 1024
      2. Intermediate Average: 1000
      3. Gain: ~335
      4. Level: 1000
      5. Dynamic Averaging: 902000
         
    6.  Calibration: Connect your LNA to the 50 Ohm terminator for initial calibration. If you don't have a 50 Ohm terminator, just leave the antenna disconnected.
       
    7. Check the "Window" checkbox, and immediately press the "Background" button in order to generate a reference background scan. This scan will be subtracted from subsequent scans thus removing the unwanted curved shape of the RTL-SDR and LNA filters. The first scan will take 6-7 minutes.
        
    8. Once the background scan is completed, you'll see the words "Corrected background!" in yellow in the top left of the FFT average window.
       
    9. You can now reconnect the antenna.

      Tip: If the FFT Average Window keeps disappearing behind the main SDR# window, push the main SDR# window to the right and bring the IF Average Window to the left so that it does not sit on top of SDR#.
       
    10. You may need to adjust the Gain and Level sliders a little bit in order to get the FFT graph on the screen. Try to keep the Gain large, as this increases the FFT gain allowing you to see small peaks more clearly.
    IF Average SDR# Plugin
    IF Average SDR# Plugin
    At this stage you now just need to wait for the Milky Way to enter your antennas beamwidth, and watch for the H-line peak. The software will continually average the spectrum.
    If you want to create a timelapse like the gif shown at the top of the post we can recommend a program called "Chronolapse", which takes a screenshot every X minutes. You can then convert those images into a movie or gif. The IF average plugin can also output data files which could be used for further analysis.
    If you do not do the calibration at all, your spectrum will appear quite wavy. Be sure to not confuse those waves with the hydrogen line peak.
    If you neglect background calibration, the spectrum will be wavy and not flat.
    If you neglect background calibration, the spectrum will be wavy and not flat.

    Example Results

    Hydrogen Line Peak (Ignore the Narrowband Peak)
    Hydrogen Line Peak (Ignore the Narrowband Peak) Pointing at (-110°, 0°) Galactic Coordinates
    Hydrogen Line Peak (Ignore the Narrowband Peak) Pointing at (-0°, 0°) Galactic Coordinates
    Using a general purpose wideband LNA still works, but results in lower SNR peaks
    Using a general purpose wideband LNA still works, but results in a much lower SNR peak.

    Other Notes

    • It is possible to get slightly higher SNR by covering the grid dish with foil, or a metal mesh. However, the improvement appears to be very small, almost negligible since the WiFi feed is only linearly polarized.
       
    • Longer integration/average times will spread the peak out more. Smaller integration times may result in less SNR.
       
    • You may wish to experiment with an elevation that maximizes the time spent pointing at the Milky Way for your location. Use Stellarium and the time shift feature (F5, or CTRL+ClickDrag) to find the optimal elevation. But lower elevations are more susceptible to man made interference.
       
    • A motorized antenna mount would allow you to scan more of the Milky Way in one day. An example build from this previous post here.