Friday, August 22, 2025
Wednesday, August 20, 2025
Contesting 101: The Contesting Community Posted by Kirk Pickering K4RO
Editor’s note: OnAllBands is pleased to post a series of articles written by accomplished amateur radio contester and DX Engineering customer/technical support specialist Kirk Pickering, K4RO. The articles, originally published in the National Contest Journal and updated with current information, offer valuable insights for both contesters new and old.
It’s a Contester Thing
For this entry of Contesting 101, I’d like to take a moment and reflect upon what the contesting community has taught me. The one theme that keeps recurring is that only contesters can appreciate what contesters do.
While I suppose that is stating the obvious, I think it is an important point to remember.
On the one hand, we have the reality that basically no one outside of contesting understands or cares about what we are doing. There are very few “spectators” that follow radio contesting, although some of the fine websites and YouTube channels covering radiosport are helping to raise awareness.
Not many people appreciate the work involved in a competitive effort. We can talk about the game to our spouse, our friends, and our coworkers, but it’s difficult to convey or demonstrate what we do. Even among casual contesters, there are many who have not learned to appreciate what goes into a full-blown effort.
We only have the view from the level we’re on, and we must climb higher to get a different view. The bottom line is that only a contester can appreciate what a contester does. We need each other to share the enthusiasm, joy, and even the “agony of defeat.” I think it comes back to mutual respect, and our mutual love of the game. Contesting is a community adventure, whether we like it or not. Even the most isolated single operator, all alone in the middle of nowhere, depends entirely upon a community of others to play the game. After the game is over, the scores and experiences are shared with the community.
Efforts are judged by the community, and merits are granted ultimately not with plaques and certificates, but with one’s reputation within the contesting community. With each passing year, contesting history is created. Call signs are added to hall of fame lists, and those who behaved poorly are remembered also. Operators come and go, and some are lost forever. Some are remembered with deep respect, some are lost in dishonor. The point is that there is no such thing as contesting in a vacuum. For better or for worse, the contesting community is an inescapable part of the game.
Those Who Know History…
One of my favorite ways to learn about the contesting community is to study its history. Thanks to the Internet, it is possible to study contesting history without leaving the comfort of our computer monitors. My first recommendation (naturally) is the National Contest Journal. The NCJ is available from the ARRL, going back to the beginning of the publication in 1973.
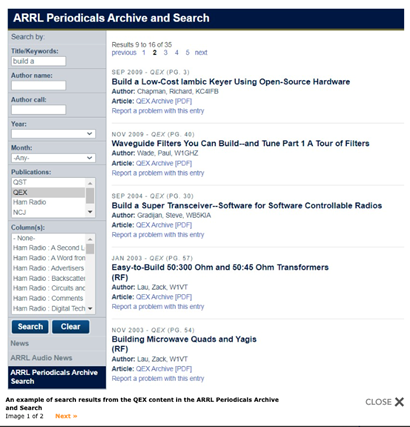
Editor’s Note: ARRL members can access specific NCJ articles (1973-2011), as well as content from QEX (1981-2011) and QST (1915-2011), through the organization’s Periodicals Archive and Search. Current and more recent issues of the NCJ and other publications are available to members in digital format.
While most hot topics are typically discussed (some ad nauseam) on the Internet today, the NCJ was the primary voice of the contesting community at the time. The letters in NCJ (to and from the editor) are particularly revealing. They provide a glimpse into the minds and hearts of contest operators from the past. One can get a sense of the hot topics of the day and witness that in this ever-changing sport, some things truly never change.
Another resource is the “CQ Magazine” archives dating back to 1945, available by subscription here. I have been reading the CQWW contest results, going back to the inception of the contest in 1948. One can follow the changes in the contest over the years and learn some of the reasons behind them. It’s also possible to trace the history of many competitors going back to their early days and see their progress over time.
Other places to read about contesting history include past issues of “Ham Radio” and “73” magazines. All issues of “73” magazine (1960-2003) are available free at the Internet Archive. Some contest community history can be gleaned from the CQContest archives at lists.contesting.com. Of particular interest are the earlier years, when contesting luminaries wrote extensively about their experiences and efforts, both on and off the air. Like so many discussion groups on the Internet, the signal-to-noise ratio has suffered over time, as everyone with an ax to grind discovers a soapbox. There are still gems worth mining. One trick is to search the archives for the call signs of operators whose opinions you’re interested in. There is some really great information available to the astute searcher from some of the sharpest minds in contesting.
One of the best places to read the experiences of current contest operators is 3830scores.com, created by WA7BNM. “3830” is where operators report their scores, and many also include a short story describing their time in the chair.
What Does All of This Have to Do with Operating?
Studying the history of contesting might not have an immediate impact on our scores, but it can increase our appreciation of the game in general. It’s fun to read the trials and successes of past operations. We can learn how some of the giants of contesting came up through the ranks and who their influences were. Understanding contesting history provides continuity with the past and can help us to interpret the current issues facing the contesting community. That’s all for this time. Please remember to send me your questions or comments. Next time we’ll get back into some nuts and bolts of operating technique. Most of all, don’t forget to have FUN with contesting. It’s possible to take this stuff too seriously, so try to keep it enjoyable, regardless of your level of pursuit.
73
-Kirk, K4RO
Tuesday, August 19, 2025
Monday, August 18, 2025
Tackling the Magruder Corridor in North-Central Idaho by Ken (WR7D)
I’m a member of the All-Idaho Contest Club (AI7ID) in Southwest Idaho. Occasionally, we plan other ham-related activities. In June, we started discussing a potential trip through the Magruder Corridor in North-Central Idaho for some POTA and SOTA action.
The Magruder Corridor is a rough, single-lane road between Grangeville, ID, and Darby, MT. It separates the Selway-Bitterroot Wilderness Area and the Frank Church River of no Return Wilderness Area. Together, these wilderness areas comprise the largest road-free area in the lower 48. For more information, check this brochure, Magruder Corridor Brochure.
Here is the basic map, which is not to scale as we confirmed over the course of the trip.
 We finally decided on a date of July 16th to begin the trip. Unfortunately, due to other planned trips and conflicts, only three of us would be able to make the journey. The other two brave souls were Scott (W7IMC) and Larry (KF7XC). I hadn’t been tent camping in some time, so I was a little reluctant, but Scott had been hiking trails and summits long before becoming involved in the SOTA program, eventually becoming a SOTA Goat.
Since I hadn’t been tent camping in a while, I did have to acquire some gear. I knew I would be taking more stuff than I would need, but I wanted to make sure I had everything I did need. This would also be my first time attempting a SOTA activation, so I wanted to make sure I had all the right radio gear for that. I’ve been doing POTA activations for some time so equipping for SOTA shouldn’t be too much of a stretch.
Our first camping spot would be the French Gulch Campsite, just west of the corridor near the Red River Ranger Station. You might notice that this isn’t on the map, but luckily, Google Maps knew where it was.
Scott had gone up the earlier and did a couple of POTA/SOTA activations on the way. Larry and I drove up on July 16th to meet him. Once we got set up, the intent was to do a POTA activation since we were in the Nez Perce – Clearwater National Forest (US-4478). Unfortunately, after we got the camp set up, the motivation was gone. It was time to chill and enjoy nature.
 On the second day, we made a brief stop at the Red River Wildlife Management Area (US-5616). We didn’t stay long enough to do a POTA activation. The plan was to attempt a SOTA activation at Green Mountain (W7I/IC-172). Here’s a picture of Larry and I before we headed into the corridor.
 When we made it to the road that led up to Green Mountain, Scott remained below to do a POTA activation of the Nez Perce – Clearwater National Forest, while Larry and I headed up the Summit. We could easily talk to Scott down below on 2m, but when we got the Elecraft KX2 set up along with the Tufteln EFRW 4:1 antenna, the bands were dead. This would be a recurring problem for the trip.
 We headed on down the corridor and traversed the roughest part of the road. It was very narrow, rough and had a severe drop off on one side. This is just a one lane road (Larry described it as a ¾ lane road) with very few wide spots to pass oncoming traffic. That usually required one of the vehicles (two in our case) to back up to a wide spot.
While we were on this impassable stretch, we came upon a mule train heading the opposite direction. Of course, the horse riders leading the train wanted to stay on the side opposite from the cliff edge so that left us hugging the edge. We were finally able to let the mule train pass as we sat still. We were a little irritated with ourselves for not getting any pictures or video of this event, but we were trying to stay not dead.
We made it through the worst part of the road and set up camp at the Observation Point campground. This is near Salmon Mountain Lookout, which would be our destination for a SOTA activation the following morning. After we set up camp, I was determined to do a POTA activation here. We were in the Bitterroot National Forest (US-4500) but not quite far enough off the road to claim a 2fer with the Selway-Bitterroot Wilderness Area (US-7994).
 I set up the Mission RGO One on a chunk of wood at the campsite. The antenna was my version of the Challenger Antenna designed by Greg, K6JER. My version is way over-engineered and complex, but it is very rugged, and I got to use my CNC machine and 3D printer to make parts for it. The band conditions were still not very good and maybe too late in the day for 20m.
I didn’t make any CW QSOs, so I decided to switch to the KX2, FT8 setup using the iFTx app on my iPhone. That was much more successful, and I wound up with 17 QSOs before calling it quits. Here’s a picture of the KX2 setup with the Challenger antenna in the background.
 The next morning, we got up early so Scott and I could hike up to Salmon Mountain Lookout (W7I/IC-012) for a SOTA activation. This was a must have activation for Scott. He missed the opportunity two years earlier because of thunderstorms. This would be my first ever SOTA activation. Probably not the easiest for a first try, but since I was going along with Scott, not too much to worry about.
Here’s a panoramic picture looking out from the observation point at the campground early morning.
 Larry decided to stay behind at the campground and do a POTA activation and provide logistics support if needed. Scott and I back tracked along the corridor for a mile or so to the Salmon Mountain trailhead. We started up the trail, which is about 1.2 miles with a climb of about 700 feet depending on what reference is used.

 I stopped below the summit and did a QSO with Scott on 2m after he reached the summit. We did the reverse on the way down. After I reached the summit, we both got a QSO with Larry back at the campsite. The volunteer at the lookout, Rene, then offered some help.
 Scott asked him if he knew Gary, W7FSI, who was manning Bare Cone Lookout in Montana, about 22 miles line-of-sight from the Salmon Mountain Lookout. Rene said, “sure, I know Gary, do you want me to call him?” He did, and Scott and I got QSO number 3. Rene then said that Warren (KI5QJT) was at the lookout on Spot Mountain, about 12 miles away, and was also a ham. Rene gave him a call, and Scott and I both got him on 2m.
That gave us the 4 QSOs we needed for the SOTA activation. We were tempted to stop there and head down, but we also wanted to get the POTA activation for Frank Church River of no Return Wilderness Area (US-10381). We set up Scott’s Yaesu FT-891 and his 20m EFHW antenna on a Jackite pole. We got an additional 11 SSB QSO’s, including 5 P2Ps. We called it good and headed back to the campsite. Here is a picture from the trail as we headed back down.
 After making it back to the campsite, we packed up and headed to Darby, MT. Scott explained that we had to get the Magruder Corridor celebratory $25 hamburger. We did make a stop at the Nez Perce Pass, which is also the Idaho, Montana state line.
 We made it to Darby and got our hamburgers. Probably not worth $25, but just fine for celebrating our trek through the Magruder Corridor.
After dinner, which was at an outside restaurant where it was blazing hot, we decided on a change of plans. We were originally planning on camping at an RV Park / Campsite south of Darby. We decided to splurge and rent a cabin at an RV Park in Darby that had actual beds and a nice shower.
 After a good night’s sleep and a good breakfast, it was time to head out. Larry and I would be heading towards home. Scott was heading up to visit Gary at Bare Cone Lookout and to do some more activations before heading home. Larry and I were planning on stopping and doing at least one POTA activation on the way.
We finally decided on Shoup Bridge Recreation Area (US-11298). We found a great shaded spot with a picnic table. We found out that the park is a very popular put-in spot for rafts on the Salmon River.
We set up Larry’s Yaesu FT-991 and my Chameleon Tactical Delta Loop antenna. The SSB portion of the 20m band was packed. We couldn’t find an opening to call CQ and couldn’t seem to beat the pileups. We switched to 17m and got two QSO’s there. We switched back to 20m and found a spot to call CQ and got two more QSOs, but then the bands faded again. This seemed to happen every day of the trip at about 1:30.
We decided to switch to my KX2, FT8 backup plan. It took me about 45 minutes to get the additional contacts I needed and then another 25 minutes for Larry. The 20m band started improving as Larry was working on his. We were also playing a crunch game with the battery on my iPhone that was running the iFTx app. The low battery warning popped up just before Larry finished.
After we both got enough contacts for a successful activation, we packed up and headed out. Somehow, I failed to get any pictures of the radio setup. This happened a couple of times during the trip. I need to work on that since the main purpose of the trip and this article is amateur radio.
 Overall, I would call it a successful trip.
I think all of us would have liked to get more activations, but it is what it is. I’m still not sure about that tent camping stuff, but I would probably do it again for the right reason. Larry and I both agreed that the full Magruder Corridor trip would be a one and done trip. I would consider going part way from one of the ends, but that 20 mile or so stretch in the middle was just a bit much. I would still recommend it to anyone that has an appropriate vehicle and the fortitude to traverse that 20-mile stretch.
Watch a Three-State POTA Rove Using the Versatile REZ Scout Antenna System (Video) Posted by OnAllBands
Want to know why you should seriously consider adding a portable antenna system from REZ to your arsenal for Parks on the Air® (POTA) activations? Because it was the POTA program—and the pursuit of finding easy-to-deploy and high-performance antenna solutions for activating parks—that inspired Mike Giannaccio, W5REZ, to establish REZ Antenna Systems, whose lineup of finely engineered, quality-made antennas are available exclusively through DX Engineering.
The company was built on POTA. So why not choose an antenna provider as passionate as you are about putting parks on the air?
In the video below, you’ll see this passion in action. REZ does a POTA rove operating from parks in Indiana, Kentucky, and Ohio. They employ a Yaesu FT-891, DX Engineering High-Visibility Orange RG-8X Coaxial Cable, and the Scout Antenna System in different configurations, from a vertical (20-6M) to delta loop (40-6M).
You’ll see how the Scout’s versatility allows operators to deploy it in the ideal manner to suit each park environment. Watch the Scout being assembled and hear clear contacts made in Rhode Island, Kansas, Oklahoma, Texas, Louisiana, Florida, Massachusetts, North Dakota, and other states.
Tags: Parks on the Air (POTA), Portable Operation, REZ Antenna
OZ9QV : Amateur Radio, Propagation and Electronics: New Toy: Handheld "Micro" QRP Transceiver.
Rapid Deployment Field Expedient Random Wire Antenna Ideas by John VA3KOT
The image shows amateur radio station VA3KOT/P inside its stealth enclosure – an old airline pilot briefcase made from stout, strong leather.
This is an almost complete station:
- Yaesu FT-891 QRP/QRO-optional in its field hardened steel 50-cal ammo box enclosure
- Bioenno 12Ah LiFePO4 battery
- 9.5ft tactical collapsible whip
- Adjustable loading coil for the whip
- PAC-12 capacitance hat for the whip
- LDG Z-11 Pro auto tuner (I like to think of it as a super fast L-match with a good memory)
- CWMorse aluminum paddles
- Heil Traveler headset (the microphone is feeling neglected due to not having been used for a very long time)
- Ham-made (by me) Guanella 4:1 balun
- Selection of coax cables
- Set of ground radials
- Random wire antennas (we’ll talk about those shortly)
- Operating table (yes, operating table too; see image below)
What’s missing? Just a chair. I have a selection of lightweight folding and collapsible camping chairs to support my delicate derriere.

Oh yes, the table; these pilot cases (NB: I am not a pilot) are so strong that, if stood on end, they make an excellent support for the radio.
When everything is packed inside the pilot’s case then it is a little on the heavy side (not to be confused with the Heaviside which is a layer of the ionosphere). The weight is manageable if it is only being carried a short distance, but I have a small folding cart for transporting it further away from my vehicle.
So what about a rapid deployment, field expedient antenna?
Rule 1: It has to fit inside the briefcase. Rule 2: If an antenna doesn’t fit inside the briefcase refer to rule 1.
I have 2 choices that meet Rule 1; a “tactical” (meaning it is painted green and looks like it might not be out of place on a Humvee) collapsible whip. It can be mounted directly on a 3/8x24tpi bracket fixed to the rear of the ammo box. It is usually deployed with a loading coil and capacitance “top” hat.

Second choice is a simple wire antenna. I am currently in favor of random wires due to their inherent multi-band flexibility. Although I have never been a fan of auto tuners, for several reasons, their speed in finding and memorizing a match for multiple bands is very valuable for the kind of hit-and-run style activations that I enjoy. The LDG Z-11 Pro is an L-match which means it is perhaps more efficient than a typical C-L-C type of manual tuner.
Don’t risk disappointment
I have read a lot of blogs and watched a lot of videos in which an operator buys a commercial wire antenna and deploys it in the field without investigating whether the antenna is actually going to work in the manner they expect. We don’t all have the time or inclination to model an antenna to find out how best to use it, but it can lead to disappointment if we don’t do the homework first.
‘Tis a gift to be simple, ’tis a gift to be free
It is very simple to make a “Simple Wire Antenna” (SWA) and it can even be free if you can scrounge some leftover wire. Climb an old telephone pole and pull down disused POTS (Plain Old Telephone Service) wire if your neighborhood has switched to fiber lines. Okay, I’m kidding, don’t do that; some poles also carry high voltage electric cables.
I have had great success recently with a sloper wire 27 feet (8.23m) long supported from a tree, or my Spiderbeam 23ft (7m) pole, and worked against four 13ft (4m) ground radials. The LDG tuner easily finds a good match of 1.5:1 or less on my main bands of interest: 20m, 30m and 40m. Out in the field there is no lossy coax transmission line involved – apart from very short sections to plumb in the Guanella 4:1 balun and tuner. This wire is a little short for 40m but presents no problem for the tuner. I have received some very good signal reports using this wire.
Then I wondered, if the wire was longer, could the antenna work even better? EZNEC helped me decide. I modeled three random wires: 27ft (8.23m), 41ft (12.5m) and 84 ft (25.6m). To make it a fair comparison, the same band (20m) was compared and the three wires were modeled in exactly the same sloper configuration. The results were very revealing.
Model 1: 27ft random wire sloper


The elevation plot shows a good directional signal with a small amount of gain at an elevation of 35 degrees.
The azimuth plot shows a wide angle of radiation with ~5dB of Front-to-Back signal strength.
The 27ft sloper has been a solid, reliable performer with strong signal reports being typical.
.
Model 2: 41ft random wire sloper


It would be tempting to throw a 41ft wire up into a tree and run it as a sloper down to the ground, but the results might be very disappointing.
Although the gain is increased, the elevation angle of maximum radiation has also increased to 75 degrees and the directionality has all but disappeared.
This would make the antenna a cloud warmer and much of the signal would disappear into space. Your CQs might perhaps be answered by extra-galactic radio operators a few thousand years in the future. How patient are you?
Model 3: 84 ft random wire sloper


If you have a much better throwing technique than mine, you might be able to get your throw weight up 62 feet in a tree to pull up an 84ft random wire sloper. But, if you look at these charts you may not want to do it.
Your signal now goes straight up into outer space. In most parts of the world 20m is not an NVIS band so almost your entire signal is wasted. As an aside, I recently experimented with a “V” wire antenna with 29ft arms supported at the ends by trees. I QSOd on it but I received a very disappointing 449 RST report for my 30 watts of signal. When I modeled the antenna afterwards I realized why – the radiation pattern was very similar to this 84ft sloper!
Why does this happen?
What causes the increase in radiation elevation? A big clue emerges when we examine the current distribution on the antenna wire. Remember, high current points along the wire are responsible for the majority of the RF energy radiated.


As we can see from the three charts, a 27ft wire has just a single high current point.
Along a 41ft wire a second high current point begins to emerge and the interactions raise the radiation angle.
When we look at the 84ft wire we can see that there are two full current maxima and the emergence of a third. Once again, these interact to raise the radiation angle.
Was this a fair comparison?
I think it was fair. None of the three wires is overly difficult to erect as a sloper. Some hams get a lot satisfaction from shooting wires high into trees on the assumption that higher and longer is better. In fact, on the lower bands an 84ft sloper might perform quite well. With the popularity of POTA, and the solar cycle at its peak, a lot of activity is to be found on 20m which is why I chose this band for the comparison.
What if …
Maybe, if we orient an 84ft wire differently, we can get it to be the outstanding performer we would expect on the higher bands. I have QSOd on several occasions with an end-fed 84ft wire hung about 5ft above ground supported by a long hedge, or low branches of small trees. Even at QRP power levels I got good results despite the antenna having no gain.
So let’s follow the old adage of getting as much wire as possible, up as high as possible, but with the proviso that it must abide by the limitations of being rapidly deployable and field expedient. How about an Inverted-L?
In fact, to make it RDFE (Rapidly Deployable, Field Expedient) I am going to call it a Lazy Inverted-L. The feed end of the wire connects to the rig (sitting on the pilot’s briefcase) at a height of 2 feet. The wire then goes to the top of my Spiderbeam 23ft (7m) pole about 3 feet (1m) away with the remainder sloping down to the far end supported 3ft (1m) high on a trekking pole. It might not be the best setup but remember it must be “RDFE”.
Model 4: 84ft Inverted-L antenna


The results are quite encouraging. First, the antenna has a decent amount of gain for a SWA. Second, the elevation angle has two useful components: a forward lobe at 35 degrees elevation with a -3dB point down to 15 degrees for a chance of getting some DX action.
There are two more lobes behind with a higher radiation angle that could yield short range contacts.
Where’s the gotcha?
The azimuth for maximum radiation changes from band to band. That would mean re-orienting the wire for band changes. Fortunately the RDFE, Lazy Inverted-L orientation makes that a fairly easy task.
Imperial or Metric?
I have tried to use both Imperial and Metric dimensions in this post. I was brought up using Imperial measurements, earned my Physics degree which was taught entirely in metric units and now tend to mix them up. Canada is officially metric but supermarkets still mark the prices of meat and produce in dollars per pound. Why? Because it sounds cheaper I guess! Okay fellow hams, what’s your favorite HF band? Mine is 65.6168ft. Yes, that’s 20m.

Help support HamRadioOutsidetheBox
No “tip-jar”, “buy me a coffee”, Patreon, or Amazon links here. I enjoy my hobby and I enjoy writing about it. If you would like to support this blog please follow/subscribe using the link at the bottom of my home page, or like, comment (links at the bottom of each post), repost or share links to my posts on social media. If you would like to email me directly you will find my email address on my QRZ.com page. Thank you!
Churches and Chapels on the Air 2025 from https://daily.hamweekly.com/
Churches & Chapels On The Air encourages ham radio operators to active local churches on September 13, 2025. The event originated in 2006 in the United Kingdom as a way to bring awareness to a local fundraising event. In 2024, 54 stations were on the air across the globe.
More information can be found on the WACRAL website. K4FMH has published information about activations taking place in the US for 2025.
The Truth About VHF SOTA by Bob K0NR
I’ve been having fun with mountaintop VHF ham radio for decades, way before Summits On The Air (SOTA) was a thing. It is an activity that I enjoy very much during VHF contests, Parks On The Air (POTA) activations, SOTA activations, and just goofing around in the mountains. Most of this activity has been on the 2-meter band, but any frequency above 50 MHz can be fun.
My philosophy with ham radio is to have fun doing ham radio things and tell people about it. If they think VHF SOTA looks like fun, other hams may try it. At the same time, I want to be open about the challenges that may be encountered. Doing SOTA activations using just VHF can be difficult, even frustrating. (This is one of the reasons I like doing it.) So this post is a cautionary tale, focused on three essential principles.

1. VHF SOTA is easy to do, except when it’s not
A VHF SOTA activation can be as simple as taking a $30 handheld radio on a hike up a summit and making a few contacts on 146.52 MHz or another simplex frequency. The radio is compact, lightweight, and completely self-contained, ready to go! This is arguably the easiest way to do a SOTA activation if the summit is near a populated area. For example, Genesee Mountain (W0C/FR-194) at 8284 feet overlooks the greater Denver area, so hike to that summit and you should have plenty of stations to work on 2m FM.
Now, try that same approach in a more rural part of the state and you may run into trouble. This is when VHF SOTA is challenging and potentially frustrating.
Which leads us to the second important principle…
2. You need to have chasers within range to contact
This is obvious, but you do need stations that are within range to work. This becomes more difficult in areas that have low population density. There may not be many radio hams within range of your chosen summit; they may not have 2m FM gear, they may not be listening to your frequency, and they may not even have the radio turned on.

Before activating a summit, consider the likely range and how many chasers might be around for you to contact. Take, for example, Aspen Ridge (W0C/SP-084) on the west side of South Park. The hike up is easy, and the elevation is substantial at 10,740 feet. The map shown above has a circle with a radius of ~25 miles, which is a conservative rule of thumb to get us started. Making radio contacts within this radius should be a slam dunk from this elevation, but it does depend on the actual terrain.
From the map, we can see that we should be able to work stations in Buena Vista and Salida, which are small mountain towns with a corresponding small ham radio population. Some of these folks make it a habit to monitor 146.52 MHz to see what activity occurs on the calling frequency, which helps. But it helps to get the word out to the target audience that you will be on the air. The basic idea is to “send invitations” for your planned activation. The local radio club (Chaffee Lake Amateur Radio Association) has a groups.io list, so you could drop an email message there. If you know some of the hams in the area, you can always reach out and ask them to be listening for you. It is always good to post an ALERT and then a SPOT on SOTAwatch because some chasers may see that. Also, keep an eye on SOTAwatch for other SOTA activators that are on other summits. During the summer months, it is common to encounter tourists, campers, hikers, or off-road enthusiasts on 2m simplex.
Looking at my Aspen Ridge logs, I see that I’ve worked K0MGL at his home station near Florrisant, at about 60 miles, with some mountains in the way. So the 25-mile radius shown on the map is quite conservative. (Much longer distances are possible.) Now, I probably would not be able to work K0MGL with just a handheld radio and a rubber duck antenna.
Which leads us to our third and final principle…
3. Every decibel of signal strength matters
VHF radio often gets described as being limited to “line of sight,” which is a helpful model but one that is incomplete. (See The Myth of VHF Line of Sight.) I often make VHF contacts beyond line of sight, bouncing signals around the mountains without knowing the actual radio path. These VHF SOTA contacts happen at the fringes of radio coverage. That is, there is just enough signal to complete a contact, but small changes in signal strength can make the difference between success and failure. So you should optimize your station as best you can.
First up is ditch the rubber duck antenna and get an antenna that is a half-wave in length on the 2-meter band. See A Better Antenna for Dualband Handhelds. Make sure it is a half-wave and not just one of those extended rubber duck antennas that are a quarter-wave. Those work a little better than the typical rubber duck, but the half-wave is far superior.
Another half-wave option is the roll-up J-pole antenna, such as the N9TAX Slim Jim antenna. (There is a slight difference in construction between a J-pole and a Slim Jim antenna but they are so similar, I consider them the same.) You can purchase this type of antenna already assembled, but it also makes for a fun project to build one from scratch. (Just search on the web for “2 meter j-pole antenna plan.”) You’ll need some way to support this antenna, such as a non-conductive pole or a rope strung from a tree.
The next step up in antenna performance is to add additional gain and directivity. I use the Arrow II 2m Yagi antenna, which provides about 6 dB of gain over a half-wave radiator. I normally just hold this antenna in my hand, but you can also set up a mast to support it.
Another option is to increase your power level. The typical HT puts out about 5 watts but a mobile radio can go up to 50 watts, a 10-dB improvement. While antenna improvements help on both transmit and receive, increased transmitter power only makes your transmitted signal stronger. However, if the other station is also running 50 watts in a vehicle or at home, more power from the summit tends to balance things out.
The key point here is that even a few decibels of improvement can yield more radio contacts.
Wrap It Up
So there we have it, three important principles to keep in mind when pursuing SOTA activations using VHF. I have had a ton of fun doing this, but I also know it can be frustrating. The most fun occurs when I make a long-distance contact that I did not expect. (My best DX from a SOTA summit using 2m FM is 245 miles.) Keeping these principles in mind helps to set expectations while providing some ideas for improving your odds of success.
73 Bob K0NR