3D printing is a big topic, and I’ve done a lot of work with this printer. There is no way for a short blog post to completely describe my experience. Consider this post the slimmest introduction about 3D printing, and a request for questions that can help others who are interested in the topic. My goal is to merely document a small part of what I’ve done for now. Expect more in the future.
For quite some time, I’ve been interested in 3D printing. At work, I had intermittent access to a Makerbot Replicator 2, but that was inconvenient and my access was shared with others, which made it even less so. I wanted a 3D printer of my own, but it was hard to justify the expense. My imagined use case was to print custom cases for various electronic projects and the like. I had used OpenSCAD to design bumper cases for the Arduino and the like, and felt that it would enable me to make more permanent versions of some projects. On the other hand, since the uses I had in mind had no real commercial or even practical value, justifying the several thousand dollar expense of a 3D printer seemed impossible.
Then, around last October, I discovered the Anet A8 kit, which was being offered for import by a number of outlets, including banggood.com which is an importer that I’ve used quite a bit for getting development boards like Arduino and ESP8266/ESP32 clones.
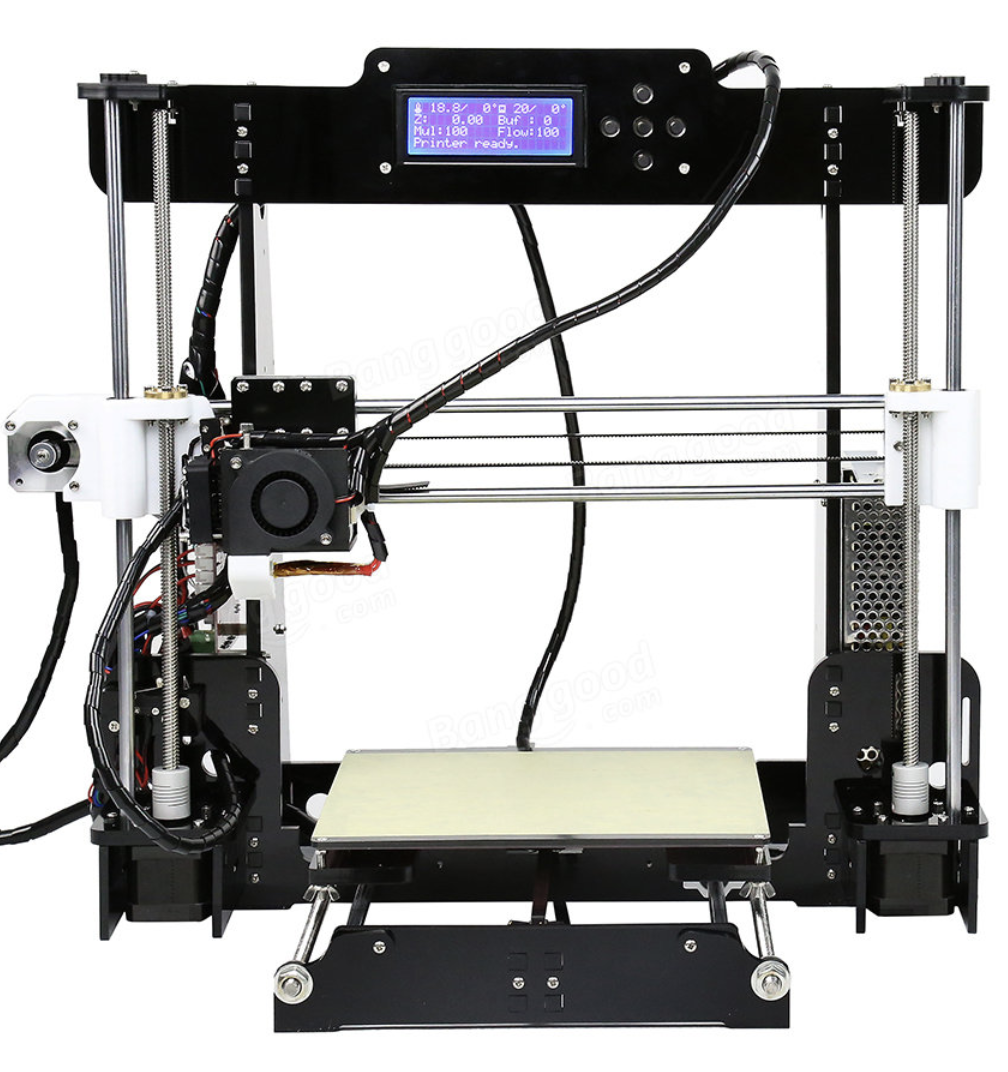
What is amazing about this 3D printer is that it is being offered as a kit at an astonishingly low price. I paid $165 for mine, shipped via DHL. I’ve seen prices hover up and down a bit, and seen kits go for as little as $140. That price point was low enough, and I read enough about people’s experience that I thought I would take a risk, and pulled the trigger.
It arrived packaged neatly in a moderately sized box. I set aside a weekend for assembly, watched a bunch of videos and set to work.
First of all, here are some of the basic features of the 3D printer.
- It is based upon the proven open source design of the Prusa I3.
- The frame is constructed mostly of parts which are laser cut from acrylic plastic.
- It has a print volume of about 220x220x180 mm, which is actually pretty good.
- It has a heated bed, and can thus print either PLA or ABS plastic.
- It uses a custom controller board that speaks G-code, and can interface via USB as well as read gcode files directly from a microSD card.
- It has been pretty popular, so there are lots of reviews, tips and tricks on YouTube and on the web. Replacement parts are fairly easy and inexpensive to get online.
It took me about two days and maybe a total of ten hours to assembly. The instructions are available as a PDF file on an included microSD card, and were generally pretty good, but there were several places where I was confused, and had to consult other resources or just sit and ponder to reveal how to continue. I made a couple of mistakes that I only discovered late: a mistake in assembling the X-axis meant that it operated in reverse when I first powered it on, which was confusing until I thought very carefully about what certain diagrams meant. But in the end, I encountered no real serious problems. After 10 hours, I had a pile of parts that I thought were assembled properly.
And here is where the instructions actually get a little weak. Making your first print is actually not that well described. In particular, making sure that your printer bed is level is not all that well described, and that is an essential step in getting good quality prints. The included software on the microSD card was also for Windows, and I had (and desired) no Windows box to run it on, so I knew that I would need some additional software, and that meant developing a working configuration file for the printer.
It took me about another day of on and off pondering until I thought that I had tweaked my printer enough so that I would give it a try. I took some green “glow in the dark” PLA that I had used on the Makerbot, and tried to print one of the pre processed g-code files for a Chinese chess piece from the microSD card:

Not bad. In fact, not bad at all! I still didn’t have the bed leveling quite right. The first layer of this print was a bit uneven and high. I tweaked it, and decided to try to actually try something more challenging. The obvious to try was a Benchy which is a little toy boat which is often used as a quality benchmark. It has overhangs, smooth curves, small details, and generally is a pretty good workout for a 3D printer.
To do this, I needed to convert the STL file into a compatible G-code file. The program that came on the microSD card with the printer was an old version of Cura, and that wasn’t really going to work for me and my Linux laptop. I ended up using the open-source program slic3r, which was just an “apt-get install slic3r” command away from being installed on my Linux laptop. I used the settings for a Prusa i3, and only adjusted the bed size to match the slightly larger size of the Anet A8. I set a layer height of .2mm, the bed heat to 50 degrees C, and the filament temperature to 200 degrees C. I did not have it generate any support structures. I then clicked the “generate g code” button, saved it out, and then copied it to the microSD card, and then hoped for the best.
Here is the result:
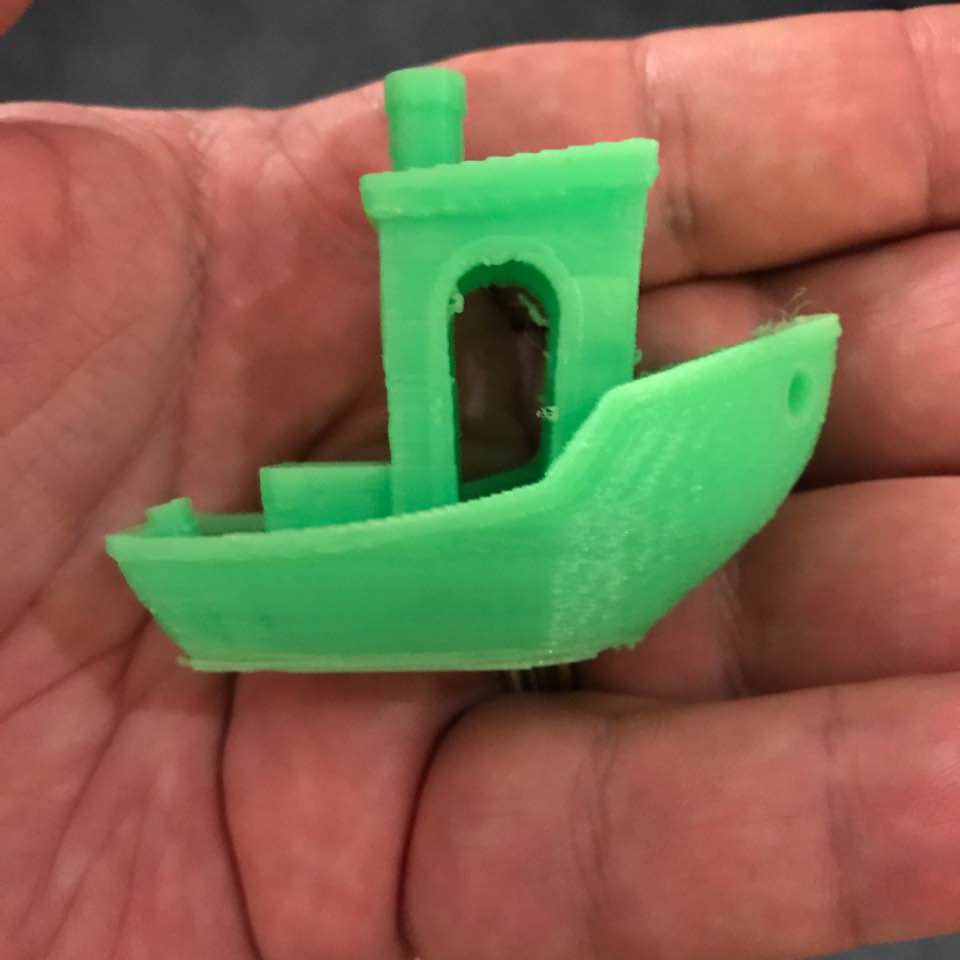
Not bad. Not bad at all! In fact, pretty freakin’ amazing! I was ecstatic that I was getting pretty respectable results after only about three days of tinkering.
Since then, I’ve printed some more cool stuff. The most complicated thing that I’ve done to date is this dinosaur skull that I downloaded from thingiverse:
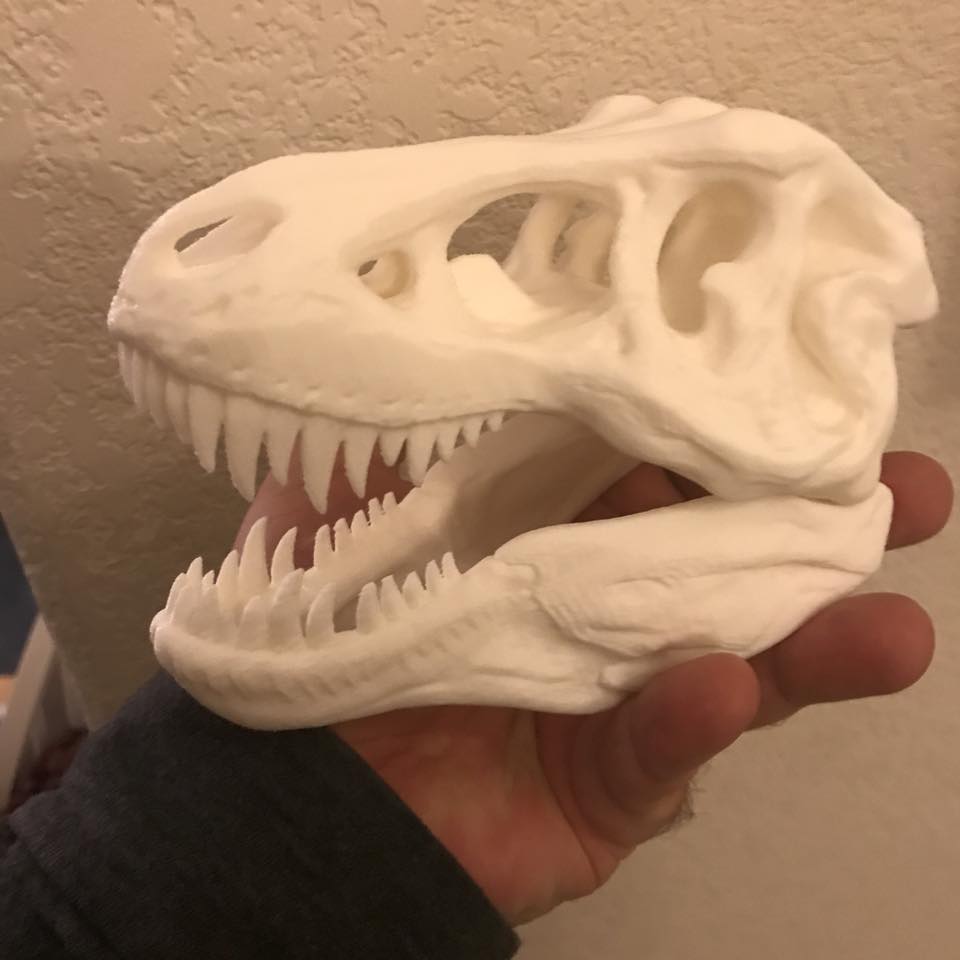
This was about 12 hours of continuous printing, using some white Solutech PLA that I bought from Fry’s Electronics. It sits on my desk at work. It’s pretty neat.
Okay, so what’s the downside?
I was happy (and mostly remain happy) but there are a few things that have been rather problematic.
First of all, in terms of general reliability, the printer has been pretty abysmal. I had a thermistor fail in the filament heater block after a few weeks of working, and it took me a white to order replacements and get them installed. Then, after just a couple of days of use, I had a thermistor sensor fail in the heated bed. I haven’t had the chance to debug this yet, but suspect that it may be something fairly simple (like the thermistor just not making contact with the heated bed and giving unreliable readings, but I have to set aside some time to dissemble the heated bed and then relevel it, so I haven’t gotten around to it yet. And this is perhaps the most annoying thing. The printer is made from parts which are sourced from the cheapest vendor imaginable, so you might imagine that you are going to have some part failures. But the overall design of the printer is such that doing some of these replacements is inconvenient or unnecessarily complicated.
For instance, the MK8 extruder is held in place by a metal bracket that slides along the X axis. It is held by a screw which is mounted somewhat inaccessibly underneath the print head (which makes it difficult to reach or even see) and a nut which is screwed onto the heat tube and clamps the stepper motor assembly. It seems like the MK8 is just designed for maximum annoyance when assembling and disassembling. I’ve had to take it apart and reassemble it multiple times, and it seems like every time I do I am looking for at least an hour of my time. It’s impossible to make any adjustment to the head without also being forced to completely re-level the bed and generally just spend a fair amount of time tweaking stuff.
The good news is that if you’ve assembled the printer, you probably have a good idea of what all the parts are and where they should go. And the parts are inexpensive. But if your goal is to have a reliable printer that you can keep running 24/7, then the Anet A8 will not be the printer for you, at least not without significant upgrades that blunt its initial low cost.
And you will be spending more money than the initial inexpensive cost will reveal. I’ve bought a bunch of heater block/thermistor replacements. I had to buy a crimping tool and a bunch of the JST connectors you use for the thermistors because none of them can be bought “pre-crimped.” The connectors are annoyingly small and difficult to crimp, and it takes me two or three tries to get them to work. I bought some additional Kapton tape. Some spiral cable guides. A set of small metric wrenches. Some additiout sonal metric hardware in stainless steel to replace cheap adjustment screws. Some white lithium grease. A roll of good quality blue masking tape to cover the bed. I suspect I’ve added easily another $100 to the cost.
A note about safety
I should also add that the design itself is not well engineered from a safety standpoint.
First of all, the entire printer is powered by a small 12V power supply which bolts to the side of the printer. To wire it up, you need to wire in a 120 volt plug (I’m in the U.S.). There is no provision for a switch or any strain relief on this cord. I got my cord from Orchard Supply and Hardware, and crimped on some spade connectors, which I then bolt in. This is what it looks like:

I do not consider this adequately safe. If someone trips over the cord, all sorts of bad things could happen, including a dead short across the freshly exposed connectors. If you intend to use this printer around children, then this part of the printer should be seriously upgraded to include a properly grounded case, fuses, and proper strain relief. As it is, I leave the printer unplugged when it is not in use, and unplug it, and carefully coil the power cable up. An upgrade to this part of the printer is clearly in my future.
The other major safety issue is that the Anet A8 board is not engineered with appropriate connectors to handle the power necessary to drive the hot end heater block and the bed heater simultaneously. While I have had no real difficulties, there are no shortage of stories on the internet about people with melted connectors like this one:

This is because the power connectors on this board are not actually properly rated for the amount of current that might be drawn through the mainboard. There are a number of ways that you can fix this shortcoming. The basic idea is to use the outputs from this board not to directly drive the bed heaters, but instead drive separate, better engineered daughter boards which use a good MOSFET and better connectors to drive the heaters. This reduces the current draw from the main board, enabling those connectors to remain cool, and shifts the power draw to the MOSFET boards which include better connectors and heatsinks. I have not yet installed those on my printers, and thus am careful not to operate the printer unattended. On long prints, I also monitor the temperature of those connectors using a non-contact infrared thermometer (yes, also bought for this product, add that to the total) and always am careful to keep a fire extinguisher handy.
In short, this is not a beginner project. If you don’t know what you are doing (or if you value your time) get a more turnkey system.
Future posts
3D printing is a big topic. I’ve also experimented with using Octopi, which is a Linux distribution for the Raspberry Pi that you can use to make printing to your Anet A8 (or any other printer) wireless (no more schlepping microSD cards around). I’ve also goofed around with PrintRunso that I can print directly from laptop. Or I could elaborate on any of the topics that I briefly introduced above. Do you have any questions, comments or suggestions? Feel free to leave them below, or leave me a note via @brainwagon on Twitter.
No comments:
Post a Comment